We sacrifice by not doing any other technology, so that you get the best of Magento.

We sacrifice by not doing any other technology, so that you get the best of Magento.

    What Exactly Is In-Store Pickup For Magento?

    Now your customers can order or reserve products online and they can also pick them from a store with an in-store pickup feature. Companies are opting for this facture to provide convenience to their valuable customers as they don’t have to wait at home for the delivery instead they can pick up their ordered products by visiting the physical store. Thus, it saves shoppers shipping costs plus this feature does not require address details.

    What Statistics prove?

    As per the eMarketer survey, 86% of customers said they will prefer buying a $50 product if they are able to save $10 by picking it up from the store. Further, 50% of customers wish that they visit the physical store to make the purchase and the address should be featured on the merchant’s site.

    An added advantage for customers as well as for merchants is that they can save money on the delivery and spend that money on additional products and can pick them all up at once rather than purchase differently.

    Examples of in-store pickup implementations

    Before we read more about in-store pickup implementation let’s see few examples of how this solution works:

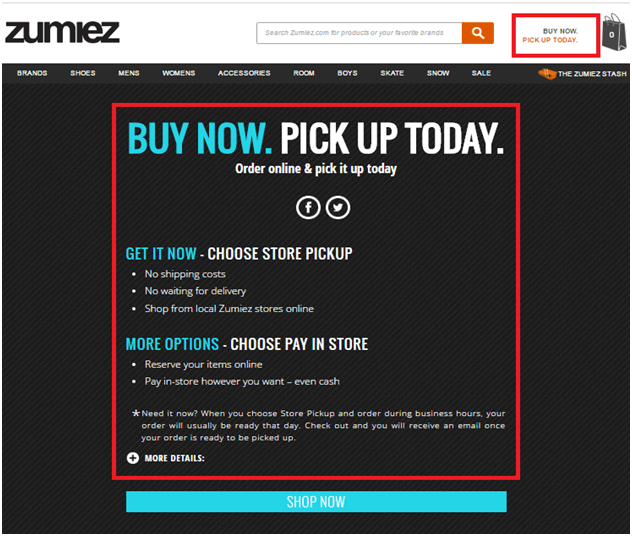
    Here, let’s take Zumiez which is a great example of multi-step implementation of the personal pickup feature. It has got in-store pickup feature on almost every relevant page. Have a look at the below image which shows the personal pickup option in the header: be it anywhere on the site.

    In-store pickup information page:

    Product page:

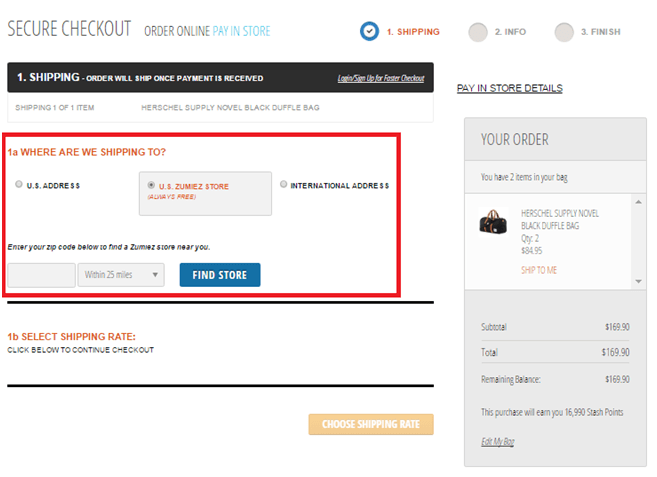
    on the checkout page, there is an option of Personal pickup

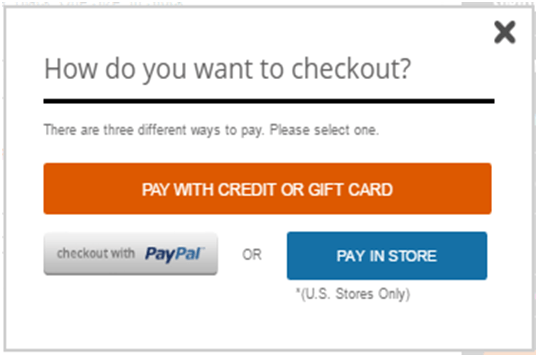
    In-store payment option:

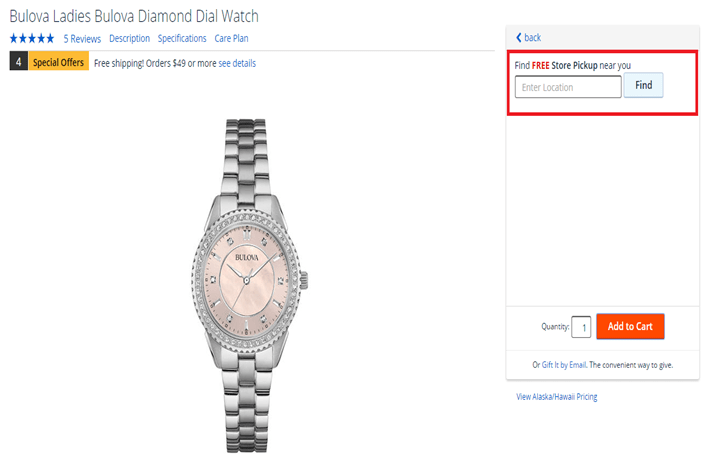
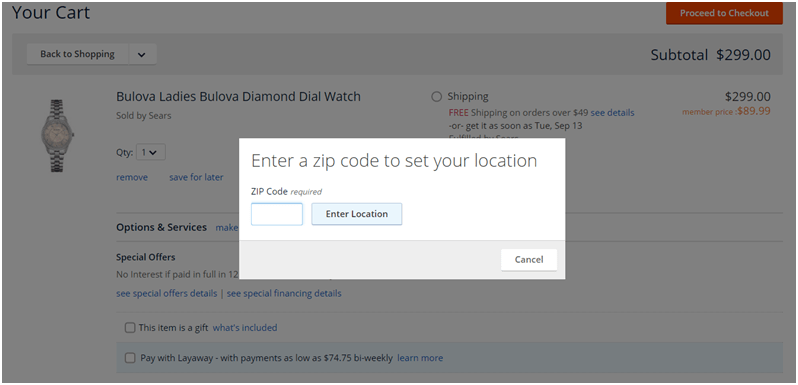
    Sears is the second-best example of in-store pickup. The main advantage of this solution is its simple layout and easy-to-find pickup options.

    In-store pickup on a product page:

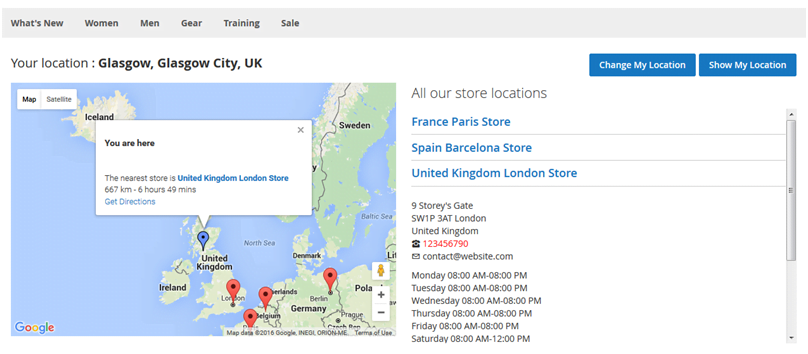
    Searching for the nearest store:

    In-store pickup options

    Now, let’s see what is in-store pickup options?

    What are the main features offered by personal pickup solutions?

    For the customers:

    • You can place an online order and then pick it up from a store.
    • Select one from different pickup locations.
    • Choose one preferred pickup date.
    • You can view and take the print of the pickup location as well as the order.
    • You can look for stores by tags, area, and distance.
    • You will receive a notification when products are ready for pickup.
    • one order includes pickup items and shipment items
    • Pay in store for the ordered products

    For the store managers:

    • Import stores and locations via CSV files
    • Set open times in mass
    • Specify the description of a pickup location
    • Designate a pickup location for each product
    • Define available pick up dates and times
    • Track store messages and orders
    • Notify managers of the selected store
    • Define available search criteria
    • One can limit the number of stores available during the checkout page
    • Place a default store on the checkout page
    • Determine minimum and maximum cart value restrictions for in-store pickup.

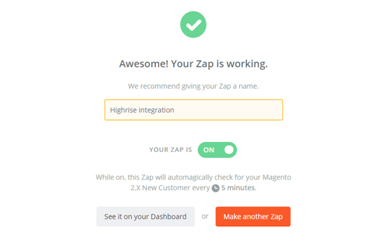
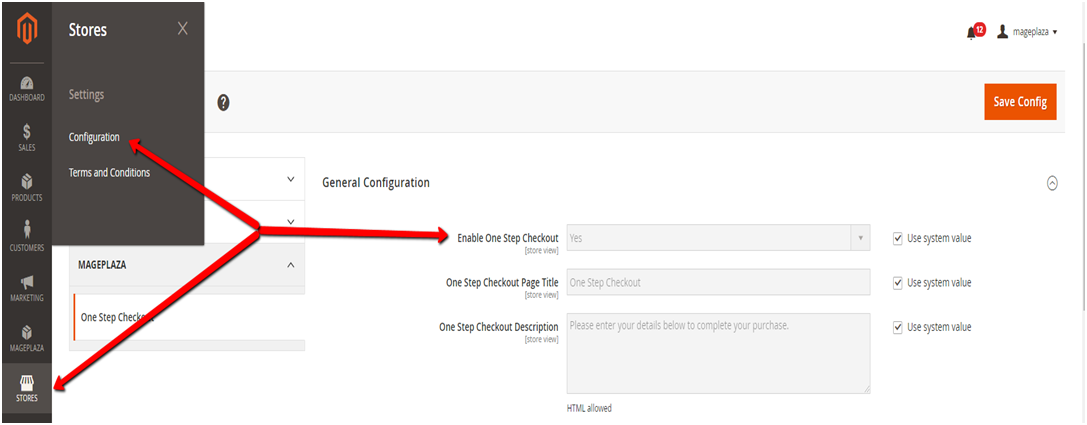
    How will you add an in-store pickup feature in Magento?

    For this task, you need a right choice of an extension. Adding an in-store pickup feature in Magento is not that difficult. But you need to keep few things in mind before making any changes:

    • Which products can be pick up from the store: Do you want to give this option for some specific orders or for all products?
    • Make a decision of who will pick up products and if you wish you can give the option to registered customers only or to everyone.
    • You can provide a geolocation option and show the nearest stores which will be based on customer’s IP addresses so that it will be easy for them to locate the nearest store. Give them options to search by postcode, city, state, etc.
    • Decide to whom you will assign the responsibility for processing the transaction and how will you inform your staff about the details of in-store pickup orders?
    • Clear your mind regarding modes of payment. Will you give them the various payment methods like customers can pay in-store when they come for in-store pickup?

    The only thing you have to do is to choose and install the right extension to implement basic in-store pickup functionality.

    Extensions for Magento store:

    There are few extensions available but it comes with limitations. Do not install an extension that disturbs the self-cycle of your online store. If you want the right extension then you need professional help. You can hire experienced Magento extension developers who can get you the perfect extension hence resulting in increased sales.

    Some complex solutions:

    This wonderful feature will help you in avoiding some problems but what if two different customers are interested in buying the same product at the same time like one is buying online and another one from the physical store. Well, the solution is to synchronize your online catalog with the brick-and-mortar store inventory. But yes such cases will need additional development.

    Personal pickup is a great choice for any online retailer and you can even customize the feature as per your need like postal code or country and which mode of payment works best for in-store pickup. You can take the advantage of this amazing feature and increase your online sales and build long-time relationships with local buyers. You are providing a faster delivery option to your customers for free. It might be challenging for new retailers but overall this feature is very easy to install, customize and manage. Thus, we strongly suggest In-store pick-up feature to all our retailers be it small or big, who has the means to offer such delivery option.

    How Store Finder Can Boost Your Online Sales?

    If you own a Ecommerce business along with multiple physical stores then you might have faced below mentioned problems:

    • Customers have difficulties finding your store
    • Your stores have different open hours
    • Your stores have different available items
    • Your stores have different sales campaign

    But, how to overcome these problems?

    Well you need a store locator. It can help your customers reach to you within no time.

    What is a store locator?

    To explain you in simple words, a store locator is a map-based service that provides comprehensive geographic details of your store location. Though, with recent researches and discovery in UX, a store locator can give you much more than just addresses and locations.

    Below is the example of store Locator for Magento 2.

    The store locator is integrated into your site and then it will let you enter or upload the details of many offices or shops and it makes it easier for website visitors to locate stores that are close to them by using an embedded Google Maps form.

    The locations and landmarks you add are not limited to stores nor does it require any official verification. Basically you can add any location you want. So, whether you have a website for stores, or want to itemize the location of any remarkable place on your website, they make them easy to locate by the audience.

    So what are the advantages of using Store Locator?

    • It saves your employees’ time
    • With a comprehensive store finder, you can provide customers with that exact information.
    • Now with smartphones and Google Maps your employee does not have to spend time providing direction guides to customer
    • Having a store finder on your site can significantly reduce the time customers need to find and get directions to your store.
    • It provides your customers a better experience.
    • It provides detailed directions as sometimes your customers may not be the best at navigation, or that your store is situated in some alley that could easily be overlooked.
    • With native Google APIs, customers can use GPS right on your website to locate themselves and get direction from there. (if he don’t know his current location)
    • Have you ever experienced to find a particular new shirt and then it turned out to be only available some-store-else? Well, don’t let your customers go through the same thing. Store Locator provides you to add the list of stores to a product page and this way your customers can know where they can find that product.
    • Store Locator allows you to set special dates for individual store locations.

    And then there are those days that customers have to call the store to ask for directions because they just can’t find it with the given address. Now with smart phones and Google Maps, it’s much easier for customers to find the direction to a store.

    Above are the reasons why you should use a store finder on your website. With the help from it, you can quickly improve your sales and service. Good luck with your business!

    The benefits of Social Login in E-commerce

    Today the E-commerce has reached new level for enhancing user experience to increase sales and it has become one of the vital requirements of a website. So for that purpose the use of single sign-on is very popular these days.

    Social media plays a crucial part and in this article we are going to explore the benefits that social login can bring to an eCommerce website.

    1. Easy Login

    First thing first, the easier registration is the most convenient way for shoppers and the automatic registration functionally means that the customer can get instant access to a store.

    One can feel annoyed if they have to fill in a registration form of a website. A small cell phone is not convenient for tapping on each blanket to add the personal data but with social login, we can have got the right solution to the problem. It will keep the shoppers feel comfortable and are more likely to stick with you.

    While visiting a website if one can find the option to sign up using their social accounts like Facebook, Google, Pinterest, etc. then this might help customers to gain user access faster than traditional sign-up methods. It is also a time-saver for people who get turned off as they have spent a lot of time inputting their personal data.

    2. For collecting users’ data

    It is but obvious that when you ask fill in a customer information sheet, he may not give you the incorrect data. In the worst case, the customer may get angered and he will quit buying products in the store. According to a reliable source, we have 88% of shoppers tending to fill in the form with incorrect data.

    As you know, each personal account of the customer has lot of meaningful data for creating the targeted advertising and if the businessmen can collect useful information then they can never need to run the fill-in-the-sheet project.

    When a particular shopper login with social login buttons and that point we can collect customer data automatically with the functional software and this way you get more data of customers is linking to several accounts as various login options.

    3. Great for the targeted marketing campaign

    Customers’ data is very useful to improve marketing campaigns of the whole business project. In detail, they can base on the information to decipher a lot of segments. Just say a businessman can separate the customer into particular groups like age, gender, interest, as well as geographic location.

    A seller knows what customers are actually looking for in their website and they can build up the proper sale marketing. So, social login provides an additional figures to improve marketing campaign.

    How to integrate Highrise with Magento 2

    If you don’t want your name under the old-fashioned store owner then you must integrate Highrise with your Magento store and if you are looking for how to integrate Highrise with Magento 2, this article is for you.

    First, you need to understand what Highrise is?

    Highrise is a CRM solution which includes the function of managing customer communications and storing all customer information. It can also track business transactions and it also allows you to import data from your Magento store.

    Lets integrate Highrise with Magento 2

    There are 4 steps for integration

    • Step 1: Create Zapier account
    • Step 2: Create Highrise account
    • Step 3: Integrate Magento 2
    • Step 4: Integrate Highrise with Magento 2

    Step 1: Create Zapier account

    • Signup Zapier

    Step 2: Create Highrise account

    • Signup Highrise
    • When you log in into Zapier, select Make a Zap to start integrating.

    Step 3: Integrate Magento 2

    • Here you need to select a Trigger App for integrating with your Magento 2 store.

    • Now here, select Magento 2.x Trigger in the drop-down list such as new customer, then save + continue

    • Then you have to connect an account to select Magento 2.x Account for that enter full domain, admin username and admin password of your Magento 2.x store as an image below:

    • After creating your Magento 2.x account, your screen will display as the following image, and then click on Save + Continue:

    • Awesome, you have successfully tested Magento 2.x. Please continue doing for the next step.

    Step 4: Integrate Highrise with Magento 2

    • From Appfield, you have to choose Highrise

    • Now, in select Highrise Action( as you can see below), you have to select on create/update contact and then click on continue

    • Next, click on Connect an Account and then follow the instructions.
    • Fill all required information in this page and then click on Save + Continue

    • Further, in this step, you need to set up a template. Create Highrise contact where you need to enter all necessary information. And after filling in the information click on the continue box.
    • Great, you have tested Highrise successfully.
    • Lastly, click on Finish and set the name of your Zap
    • Now, you have tested Highrise successfully. Finally, click on Finish and then set the name of your zap to complete.

    • Wonderful! Your Zap is working and from now it will auto-check your Magento 2.x new customer.

    • Lastly, here is the contact that you have just created.

    With this, we come to the end of the tutorial on How to integrate Highrise with Magento 2.

    Highrise CRM is a great tool. It will help your business perform better. It saves your time in managing customer data as well as helps increase the conversion rate dramatically. If you still failed to integrate, then hire Mage Monkeys for the Magento integration service.

    Data Migration from Magento 1.x to Magento 2.x

    Since the release of Magento 2, data migration has become a hot topic and we all know Magento 2 comes with better coding for bug fixes, many features, and mind-blowing functionalities to the user.

    The upgrade will give you the best performance and it will also improve the shopping experience for your customers.

    Migration Features of Magento are as below

    Flexible architecture

    Magento 2 has better coding which makes it user-friendly, it has efficient APIs, theme capabilities, and extension of turnkey.

    Improved shopping experience

    To increase customer interaction on your site, now you can embed video into the product page. A customized checkout process and a quick response designed arrangement can make the customer shopping experience a delight and this online retailer can create more customer base for themselves.

    Enhanced productivity

    Magento 2 will surely make your business productivity more efficient as its Admin Panel comes with a new, advanced, and friendly interface to manage everything properly.

    The business person /retailer experience better productivity as he can get better access to acute statistics at their comfort and can import new products four times easier and faster than earlier.

    Improved movement of Magento 2 Figures

    After upgrading the store to Magento 2, it will surely increase the sale conversion rates. Magento 2 as a platform works very well in reserving the entire page content and optimized coding. The speed of loading pages, like the product catalog or the checkout page, will increase by 50%.

    Payment Gateways are safe

    The cyber source can be put in an application for a payment method if the store is based on Magento 2 Enterprise Edition i.e. (EE). Braintree, PayPal, Authorize.net, are few safe payment gateways that are compatible with Magento 2. Hence this quality of Magento 2 will improve online shopping security. This feature without a doubt will improve the security of shopping online.

    Easy-to-Maintain and Upgrade

    Magento 2 provides flexible and unsurpassed scope for developers to maintain and upgrade the site as it has useful features for E-commerce businesses.

    What do we provide?

    Upgrading the store from Magento 1.x to Magento 2.x needs detailed technical facts and expertise. With the help of technical experts, you can upgrade the store from Magento1.x to Magento 2.x without any loss of data, the data Is transferred with 100% accuracy and security.

    What can be done?

    With the help of Magemonkeys service, you will be benefitted from the upgraded services of Magento 2

    Magento 2 Data Migration

    Magento 2 Migration Service supports for Magento 1.x data:

    Bringing SEO Value

    To enhance SEO value in Google SERPs, Magento 2 Migration Service by Magemonkeys keeps stable the following elements in the migration progress:

    • File structures
    • URLs
    • Redirections
    • Managing canonicals
    • Internal site linking structure

    Our team is confident enough in moving all the data from the old Magento 1.x version to New Magento 2.x version. It can transfer data that includes current orders customer information and so without any data loss.

    Are you facing Magento Site down issue?

    Your Magento store might be down or it may stop working during installation process*

    So before the processing installation you must take back-up of your store by restore the backed-up state and if you don’t have a backup then our below steps will disable the extension.

    Step 1: You have to disable extension in backend

    • Step 1: Login into Admin.
    • Step 2: Choose Store/configuration.
    • Step 3: Open Mage monkeys tab.
    • Step 4: Choose the extension which you want to disable.

    Step 2: Next step is to Disable via command line

    If in case step 1 is not working then do this activity by command lines

    Before doing this step, make sure that you know how to run command lines.

    It has nothing to do with our extension or in general with any other extension. If you come across an error like “ Cannot write “,”Permission denied “, Php is not a command” then you have to contact your developer or host provider.

    Generally, you should run the following commands to disable an extension:

    In this case, we will disable Magemonkeys_Osc

    php bin/magento module:status ##to list all installed modules

    php bin/magento module:disable Magemonkeys_Osc

    php bin/magento cache:flush

    php bin/magento cache:clean

    As per requirement, you can also run module:status again to see if the extension is actually disabled.

    If you have Redis, Varnish in cache then first clear it off and then deploy it the need arise

    To ease the investigation process you can write down the step that you have done during installing the extension process, take a screen shot of the error and then send it to us.

    We will get back to you.

    Is Your Magento Theme Ideal?

    A theme of any website plays an important role. And when it comes to having the right Magento theme, you need to keep a few things in mind. Let’s see what one needs to consider in the existing Magento theme. This will help you to realize your Magento theme is ideal or not.

    1. A User-Friendly Layout

    The Magento store should be both good looking and user-friendly. If the UI/UX is difficult to use and understand you may lose on to the audience. The loading time should be minimum. One needs to remember the following points

    • Easy navigation
    • Simple back to top button
    • The search bar and shopping icons should be situated at the original place.

    So, in all this should be one of the reasons that your theme stays up in the store.

    2. A Perfect Layout and Template

    Select a theme and layout which is apt for your business. For example, say you own a fashion house then the theme should be colourful and chirpy. Select some theme which is in line with the trend.

    3. The Right Placement of Promotions and Banners

    You need to ensure that the banners are placed appropriately. A theme is incomplete without the banner or promotional sliders. These banners or sliders help in the success of any website. It is found that most ideal way of spreading a word about your brand can be done using a sliding or a rotating bar.

    4. Theme customization

    The theme should be such that one can customize it according to their requirements. Firstly, you should check out the primary options that are available and then go on to the secondary ones. All you need to do is ensure that you have the flexibility to personalize the website as per the latest trends.

    5. Compatibility Across Cross Browsers

    Any theme that you select needs to be compatible across all the browsers. It completely depends on the user as to what browser they would use. Hence, your theme should be performing equally regardless of the browser.

    6. Responsive

    Most of the people use their mobiles to access any website. This usage will only increase in the near future. The theme should be responsive on all the devices i.e. mobiles, tabs, laptops.

    7. SEO Friendly

    An SEO friendly website is a need of the hour. Magento is blended with a search engine optimization friendly environment. The theme just needs to follow the regular scripting practice and be doing all legitimate things for the bots to index your website. The HTML/CSS coding must be perfect.

    8. A Speed of the Theme

    Speed is one of the main aspects of any website. One should take care that the theme does not comprise of heavy graphics and unnecessary features. This may affect the speed of the website. As we said earlier, the loading time of the website should be minimum.

    9. In-built Blog

    Blogs have become an essential part of any business. Blogs help the audiences to connect with the brand. Also, blogs help brands rank well on search engines. Fresh content helps in SEO as well as connecting with the audiences.

    10. Social Media Elements

    Social media platforms are another way of spreading a word about your business. The brand promotions, recognitions puts the business/brand in a different ball game. You should ensure that the theme chosen should comprise the social media icons. The updates on twitter should be visible easily to the audiences.

    Apart from all these points, you should also remember to have reviews and ratings on your product or service page. This will help the audiences to form an opinion about your offerings.

    There are many themes available but having a special theme for your niche will help you stand distinct amidst the crowd. Have an equal balance of all that you need to have the best website.

    How to configure SendGrid SMTP in Magento 2?

    You might have seen that the transaction email open rates method is more approachable than any other similar method. Your customers are more likely to open emails regarding event announcements, new product updates, and fresh sales.

    But what is SendGrid?

    SendGrid allows you to send the email via SMTP or HTTP or any other. Companies make use of SendGrid to draft emails regardless of their environment. The company’s official client libraries can be used to send emails. It has been built to serve developers.

    One can easily configure SMTP himself effortlessly. You can follow the below-mentioned steps in order to configure SendGrid SMTP in Magento 2.

    You can configure SendGrid SMTP in Magento 2 in just 3 steps.

    • Step 1: Setup a new SendGrid account
    • Step 2: First download and then install Magento 2 SMTP extension
    • Step 3: Integrate SMTP extension and Magento 2

    Step 1: Setup a new SendGrid account.

    • From the official website, you can sign in to a new account.
    • The technical data is taken from their documentation then you need to note them because you will use them in the later steps
    • Setup an SMTP username and password for your SendGrid credentials to the server hostname to smtp.sendgrid.net
    • Use port 465 for SSL and 25 or 587 for plain/TLS connections.

    Step 2: First download and then install Magento 2 SMTP extension

    For a better explanation, we have used the Mage monkeys SMTP extension. It a free extension so you don’t have to worry if there is any risk involved.

    Step 3: Integrate SMTP extension and Magento 2

    In the last step, do the following changes in the Admin panel.

    SMTP > Configuration. Expand General Configuration; choose Yes to turn Magemonkeys SMTP. Now do the following steps to complete the SMTP configuration.

    • Select SendGrid in the SMTP provider field.
    • Click on the AutoFill button to enable Host, port, Authentication, and Protocol to automatically fill up the match to SendGrid provider.
    • In the Username and Password field, you have to fill in the SendGrid account’s information which you have set up in Step 1.
    • Lastly, in the Test Email Recipient, you have to enter the email which you want to send.
    • If everything goes well then you will receive a report.

    In this way, we set up SMTP in Magento 2 with the SendGrid provider!

    Now you go ahead and try this amazing SSMTP service that allows you to deliver your email via the company’s servers. If you still failed to integrate, then hire Mage Monkeys for the Magento integration service.

    Magento 2 Performance Optimization – A complete guide for your Magento store


    As per Benchmark Testing, that makes the comparison between out-of-the-box supported and recommended configurations for Magento 2.0 which proved that Magento 2.0 is considered as the greater platform than Magento 1.x keeping in mind all metrics and use cases. Magento 2.0 will never disappoint you when you talk about a result.

    • Per hour orders process up to 39%
    • For catalog browsing, delivery nearly instant server response times.
    • 66% faster add-to-cart server response times.
    • Up to 51% faster end-to-end checkout times.

    Now, it’s time to understand How Magento 2 Performance is optimized?

    A normal Ecommerce page takes more than 3 seconds to load a product page. Now think for a minute that your customer can be annoyed if he needs to browse through five similar pages on your website? Indeed they will never be patient to wait for the delay. Hence keep the below steps in mind to give them the best experience of your site.

    Magento 2 Performance Optimization Step-by-step:

    • Step 1: Enable Flat Categories and Products
    • Step 2: Merge CSS and JS Files
    • Step 3: Content Delivery Network
    • Step 4: Caching
    • Step 5: Image Optimization
    • Step 6: Enable Compression
    • Step 7: Reduce Server Response Time
    • Step 8: Magento Updates

    Before following all steps, let us give you bonus advice in advance.

    First, check your website score in Google PageSpeed Tools

    Magento store speed score via Google Page Speed Checker

    If your score is low, make it high by following Google guidelines.

    Step 1: Enable Flat Categories and Products

    Magento 2 has created a great influence by its ability of database loading. In the configuration, you need to enable Flat Catalog to speed up that. Flat Catalog allows offloading the number of the database once there is any request for showing the product. Parallelly, the MySQL query complexity will reduce.

    Now, Go to backend, Stores > Configuration > Catalog > Catalog > Storefront,
    Choose Yes in Use Flat Catalog Category field.

    Enable Flat Categories

    Step 2: Merge CSS and JS Files

    In this step, you need to follow is merging and minifying CSS and Javascript files, which means making the web page as light as possible for the fast loading that puts Magento 2 into production mode.

    ./bin/magento deploy:mode:set production

    Javascript File

    Go to backend, Stores -> Configuration > Advanced > Developer > JavaScript Settings

    Set Merge JavaScript Files to Yes

    Set Minify JavaScript Files to Yes

    Minify JavaScript Files

    CSS File

    Go to backend, Stores > Configuration > Advanced > Developer > CSS Settings

    Set Merge CSS Files to Yes

    Set Minify CSS Files to Yes

    Minify CSS Files

    When finished, click on Save Config and flush cache to activate the change.

    Step 3: Content Delivery Network

    Content Delivery Network (CDN) is a special system that can connect all cache servers also it also supports geographical proximity by taking over the delivering web content and fasten the page loading.

    Follow our guide to set up CDN for Magento 2 stores.

    Go to backend, Stores -> Configuration > General > Web > Base URLs (Secure)

    set up CDN for Magento 2 stores

    Step 4: Caching

    In the backend go to the System > Cache Management.

    Cache Management

    Here, you will find plenty of caching options to flush your Magento 2 cache.

    Click on Enable and then submit the options which you want.

    Step 5: Image Optimization

    The image plays an important factor to make your Magento 2 store’s performance more vivid. However, uploading the heavy size image on your site is one of the crucial reasons for the overload page. So, you have to compress the image before submitting any image. Using a JPEG format for Product images, and PNG or SVG for the layout as well as the logo is the best solution.

    Step 6: Enable Compression

    Follow below resources to enable compression by Google’s offer.

    Now let’s change nginx compression directives from:

    gzip_types: text/plain application/x-javascript text/javascript text/xml text/css image/x-icon image/bmp image/png image/gif; to gzip_types: *;

    Step 7: Reduce Server Response Time

    Your site’s response time is quite good with approximately 0.5s all thanks to Magento 2 built-in cache functionality. But as Google expects it is not the ideal time. Due to that, Magento 2 provides support to Full Page Cache via Varnish natively.

    Now, let’s set up Varnish to get the first byte around 0.1-0.2s.

    Go to backend, Stores > Configuration > Advanced > System > Full Page Cache,

    Transfer Caching Application to Varnish Cache.

    Transfer Caching Application

    Open the Varnish Configuration section, complete the settings:

    Varnish Configuration

    Step 8: Magento Updates

    Remember to update your Magento 2 store. Mage monkeys team will try their best to help you optimize the site performance.

    The result after updating your store from older version to latest version.

    Page Insights Magento stores

    Performance Toolkit (Optional)

    Installation

    jMeter:

    – go to http://jmeter.apache.org/download_jmeter.cgi and download jMeter in Binary section (pay you the attention that Java 6 or later is required) – unzip the archive

    Plugins (only if you want to additional reports (like graphs)):

    – go to http://jmeter-plugins.org/downloads/all/ and download JMeterPlugins-Standard and JMeterPlugins-Extras

    – unzip them to the appropriate ext directory of your jMeter instance.

    – Additional reports can now be added via GUI.

    Usage

    Before running the jMeter tests for the first time, you will need to first use bin/Magento setup:performance:generate-fixtures command to generate the test data.

    Run via console

    Scenario can accept parameters that are described bellow in format <parameter_name:default_value>:
    
    <host:localhost> URL component 'host' of application being tested (URL or IP). Default is 'localhost'.
    
    <base_path:/> Base path for tested site. Default is '/'.
    
    <report_save_path:./> Path where reports will be saved. Reports will be saved in current working directory by default. Default is './'.
    
    <ramp_period:300> Ramp period (seconds). Period the request will be distributed within. Default is '300'.
    
    <orders:0> Number of orders in the period specified in the current allocation. If <orders> is specified, the <users> parameter will be recalculated. Default is '0'.
    
    <users:100> Number of concurrent users. Recommended  amount is 100. Minimal amount is 10. Default is '100'.
    
    <view_product_add_to_cart_percent:62/> Percentage of users that will only reach the add to cart stage. Default is '62'.
    <view_catalog_percent:30/> Percentage of users that will only reach the view catalog stage. Default is '30'.
    
    <guest_checkout_percent:4/> Percentage of users that will reach the guest checkout stage. Default is '4'.
    
    <customer_checkout_percent:4/> Percentage of users that will reach the (logged-in) customer checkout stage. Default is '4'.
    
    <loops:1/> Number of loops to run. Default is '1'.
    
    <admin_path:admin/> Admin backend path. Default is 'admin'.
    
    <admin-user:admin/> Admin backend user. Default is 'admin'.
    
    <admin-password:123123q/> Admin backend password. Default is '123123q'.
    
    <think_time_deviation:1000> Deviation (ms) for "think time" emulation. Default is '1000'.
    
    <think_time_delay_offset:2000> Constant delay offset (ms) for "think time" emulation. Default is '2000'.
    
    Necessary parameters must be passed to [command line](https://magemonkeys.com/magento-2-command-line-interface-cli.html) with "J" prefix: "-J<parameter_name>=<parameter_value>"
    

    Example:

    > cd /directory_of_jMeter/bin/
    
    > jmeter -n -t /path_to_benchmark_file/benchmark.jmx -Jhost=magento2.dev -Jbase_path=/ -Jusers=100 -Jramp_period=300 -Jreport_save_path=./
    

    Run via GUI

    Open jMeter/bin directory and run jmeter.bat

    Click in menu File -> Open (Ctrl+O) and select file; or drag and drop benchmark.jmx file in opened GUI.

    On the first tab ‘Test Toolkit’ you can change ‘User Defined variables’ like as , , , , .

    For running script click “Start” (green arrow in the top menu).

    Results of running (Report types)

    When you run via GUI you can see the result of working in the left panel. Choose the corresponding report.

    After running the script via console report will be created in the path that has been specified.

    Threads

    jMeter script consists of five threads. Setup thread and four user threads.

    The percentage ratio between threads is as follows:

    • 62% browsing, adding items to the cart, and abandon cart (BrowsAddToCart suffix in reports)
    • Only Browsing is 30% (BrowsAddToCart suffix in reports)
    • 4% Browsing of adding items to cart and checkout it as guest (GuestChkt suffix in reports)
    • 4% Browsing of adding items to cart and checkout as registered customer (CustomerChkt suffix in reports)

    Magento 2 Performance Optimization Tools:

    If you are looking for professional shortcut tools to cut down the performance time conveniently, Mage Monkeys is happy to introduce one useful extension for both Magento 1 & 2 stores.

    Insights from a Magento Community Initiative to Increase Sales from Mobile Users

    Are you aware of the fact that 86 percent of mobile shoppers abandon their shopping carts during the checkout process.

    Today the mobile Ecommerce has become a huge challenge. In a way that it requires a collaborative efforts to overcome which is why Magento excitedly became the sponsors of the mobile Ecommerce Optimization Initiative.

    Below are the results from the Initiative:

    So far, Magento has gathered preliminary merchant data on four of the experiment templates:

    • Security icon placement
    • Credit card autodetect
    • PayPal express checkout
    • Zip code autofill

    EXPERIMENTS:

    Security Icon Placement

    Security is most concern factor for online shoppers because they share their personal and credit card information online. The main aim of this experiment is to determine how the presence of a security icon at checkout will impact mobile conversions.

    With an average lift of over 17 percent, the security icon surely has had a dramatic impact on mobile based revenue per visitor or RPV.

    • Credit Card Auto Detect

    During the online shopping experience if any form of friction occurs like added form fields or checkboxes then it might lead to shopping cart abandonment.

    The Credit Card Auto Detect experiment is to reduce this friction by auto-selecting a customer’s credit card type (Visa vs. Mastercard etc.) based on the first few numbers of the card they enter. This experiment was designed to decrease the number of fields to fill at checkout page and the credit-card auto detect had an RPV lift of 21.53 percent for desktop but a -7.99 percent drop for mobile users.

    With this experiments some merchants had seen a positive lift for mobile so Magento recommends testing it yourself to decide whether it works for you too.

    • PayPal Express Checkout

    Customers doesn’t like to enter the credit card number, expiry date and security code each time they shop online as they want their online sjopping to be fast and easy.

    So, this experiment will let you add an easy-pay options such as PayPal and/or PayPal Credit buttons on your checkout page which will increase a shopper’s likelihood of completing their shopping. You can easily apply the PayPal checkout button at different points in the checkout process. Adding the PayPal shortcut checkout on the Mini cart page provided the largest impact on RPV (with an 8.72 percent lift) without decreasing the average order value.

    Try to place this PayPal checkout buttons more prominently on your site and experiment with different locations to conclude what works best for you.

    • Zip Code Autofill

    Your customers mobile shopping experience might see a additional friction if they are manually entering shipping information every time they shop. The Zip Code Autofill experiment aims to reduce this friction by auto-filling a customer’s city, state, and country fields after their zip code is entered.

    This experiment has some surprising results, for mobile the RPV dropped by 0.88 percent, while the RPV for desktop increased by 3.42 percent.

    The relatively small impact on conversion may be attributed to the fact that shipping information is one of the last steps in the checkout process, where cart abandonment rates are already low.

    This may be a good experiment to try if you see a high shopping cart abandonment near the end of the checkout process.

    Its Time for you to start experimenting

    Magento recommends experimenting with the optimizations which you anticipate will have the biggest impact. And don’t worry if they don’t produce the immediate results you want. The key is to keep experimenting until you find the mix of changes that best work for you and your site.