We sacrifice by not doing any other technology, so that you get the best of Magento.

We sacrifice by not doing any other technology, so that you get the best of Magento.

    How to get Wishlist Items by customer id in Magento 2?

    Here, we are discussing how to get wishlist items of the customer by customer id.

    You can display Customer Wishlist item details in the store.

    Use MagentoWishlistModelWishlist Model file to get Wishlist.

    Create Block to load Wishlist collection.

    <?php
    namespace MagemonkeyWishlistBlock;
    
    class Magemonkeydemo extends MagentoFrameworkViewElementTemplate
    {
    public function __construct(
    MagentoFrameworkViewElementTemplateContext $context,
    MagentoWishlistModelWishlist $wishlist,
    array $data = []
    ) {
    $this->wishlist = $wishlist;
    parent::__construct($context,$data);
    }
    
    /**
    * @param int $customerId
    */
    public function getWishlistByCustomerId($customerId)
    {
    $wishlist = $this->wishlist->loadByCustomerId($customerId)->getItemCollection();
    return $wishlist;
    }
    }
    ?>

    Now, add below code and call the function in a template file, It will display wishlist item if found, otherwise “Nothing found in your wishlist!” will be displayed.

    <?php
    $customerId = 7; /* CUSTOMER'S ID */
    $wishlistCollection = $block->getWishlistByCustomerId($customerId);
    if(count($wishlistCollection)) {
    foreach ($wishlistCollection as $_item) {
    /* You can get ID, Name, Desc. ... */
    echo $_item->getProduct()->getId();
    }
    } else {
    /* Display message if no item found in wishlist */
    echo __("Nothing found in your wishlist!");
    }
    ?>


    Magento2 generate PDF file programmatically

    1. Create Index.php at app/code/Magemonkeys/Pdf/Controller/Index folder with following code:
      <?php
      namespace MagemonkeysPdfControllerIndex;
       
      use MagentoFrameworkAppActionAction;
      use MagentoFrameworkAppActionContext;
      use MagentoFrameworkAppResponseHttpFileFactory;
       
      class Index extends Action
      {
          protected $fileFactory;
       
          public function __construct(
              Context $context,
              FileFactory $fileFactory
          ) {
              $this->fileFactory = $fileFactory;
              parent::__construct($context);
          }
       
          public function execute()
          {
              $pdf = new Zend_Pdf();
              $pdf->pages[] = $pdf->newPage(Zend_Pdf_Page::SIZE_A4);
              $page = $pdf->pages[0]; // this will get reference to the first page.
              $style = new Zend_Pdf_Style();
              $style->setLineColor(new Zend_Pdf_Color_Rgb(0,0,0));
              $font = Zend_Pdf_Font::fontWithName(Zend_Pdf_Font::FONT_TIMES);
              $style->setFont($font,13);
              $page->setStyle($style);
              $width = $page->getWidth();
              $hight = $page->getHeight();
              $x = 30;
              $pageTopalign = 850; 
              $this->y = 850 - 100; 
              
              $style->setFont($font,14);
              $page->setStyle($style);
              $page->drawRectangle(30, $this->y + 10, $page->getWidth()-30, $this->y +70, Zend_Pdf_Page::SHAPE_DRAW_STROKE);
              
              $style->setFont($font,13);
              $page->setStyle($style);
              $page->drawText(__("Customer Details"), $x + 5, $this->y+50, 'UTF-8');
              $style->setFont($font,11);
              $page->setStyle($style);
              $page->drawText(__("Name : %1", "Jayeshkumar Lakum"), $x + 5, $this->y+33, 'UTF-8');
              $page->drawText(__("Email : %1","jayesh@webtechsystem.com"), $x + 5, $this->y+16, 'UTF-8');
       
              $style->setFont($font,11);
              $page->setStyle($style);
              
              $page->drawText(__("PRODUCT NAME"), $x + 60, $this->y-10, 'UTF-8');
              $page->drawText(__("PRODUCT PRICE"), $x + 200, $this->y-10, 'UTF-8');
              $page->drawText(__("QTY"), $x + 310, $this->y-10, 'UTF-8');
              $page->drawText(__("SUB TOTAL"), $x + 440, $this->y-10, 'UTF-8');
       
              $style->setFont($font,10);
              $page->setStyle($style);
              $add = 9;
              
              $page->drawText("$12.00", $x + 210, $this->y-30, 'UTF-8');
              $page->drawText(10, $x + 330, $this->y-30, 'UTF-8');
              $page->drawText("$120.00", $x + 470, $this->y-30, 'UTF-8');
              $pro = "Dummy Product";
              $page->drawText($pro, $x + 65, $this->y-30, 'UTF-8');
              
              $page->drawRectangle(30, $this->y -62, $page->getWidth()-30, $this->y + 10, Zend_Pdf_Page::SHAPE_DRAW_STROKE);
              $page->drawRectangle(30, $this->y -62, $page->getWidth()-30, $this->y - 100, Zend_Pdf_Page::SHAPE_DRAW_STROKE);
              
              $style->setFont($font,15);
              $page->setStyle($style);
              $page->drawText(__("Total : %1", "$50.00"), $x + 435, $this->y-85, 'UTF-8');
              
              $style->setFont($font,10);
              $page->setStyle($style);
              $page->drawText(__("Dummy Footer"), ($page->getWidth()/2)-50, $this->y-200);
       
              $fileName = 'order.pdf';
       
              $this->fileFactory->create(
                 $fileName,
                 $pdf->render(),
                 MagentoFrameworkAppFilesystemDirectoryList::VAR_DIR, // this pdf will be saved in var directory with the name meetanshi.pdf
                 'application/pdf'
              );
          }
      }


    Magento2 Display Module List

    Run below command to see a full list of enabled or disabled modules:

    php bin/magento module:status

    To enable a module, use the below command:

    php bin/magento module:enable Magemonkeys_AjaxNewsletter

    To disable a module use the below command:

    php bin/magento module:disable Magemonkeys_AjaxNewsletter

    To uninstall a module use the below command:

    php bin/magento module:uninstall Magemonkeys_AjaxNewsletter


    Magento2 Disable Payment Method Programmatically

    1. Create events.xml at app/code/Magemonkeys/DisablePayment/etc/ 
      <?xml version="1.0"?>
      <config xmlns:xsi="http://www.w3.org/2001/XMLSchema-instance" xsi:noNamespaceSchemaLocation="urn:magento:framework:Event/etc/events.xsd">
          <event name="payment_method_is_active">
              <observer name="disable_payment" instance="MagemonkeysDisablePaymentObserverPaymentMethodAvailable" />
          </event>
      </config>
    2.  Create PaymentMethodAvailable.php at app/code/Magemonkeys/DisablePayment/Observer/ with the following code
      <?php
      namespace MagemonkeysDisablePaymentObserver;
      use MagentoFrameworkEventObserverInterface;
      class PaymentMethodAvailable implements ObserverInterface
      {
          public function execute(MagentoFrameworkEventObserver $observer)
          {
              // you can replace "checkmo" with your required payment method code
              if($observer->getEvent()->getMethodInstance()->getCode()=="checkmo"){
                  $checkResult = $observer->getEvent()->getResult();
                  $checkResult->setData('is_available', false); 
              }
          }
      }

    Set custom price of Product when adding to cart

    Create events.xml file in folder ‘Magemonkeys/Cartmodule/etc/frontend’ and use event ‘checkout_cart_product_add_after’. And paste the below code in it.

    <?xml version="1.0"?>
    <config xmlns:xsi="http://www.w3.org/2001/XMLSchema-instance" xsi:noNamespaceSchemaLocation="urn:magento:framework:Event/etc/events.xsd">
        <event name="checkout_cart_product_add_after">
            <observer name="addprice" instance="MagemonkeysCartmoduleObserverAddPrice" />
        </event>
    </config>

    And now create ‘AddPrice.php’ file in ‘Observer’ folder with the following code:

    <?php
        namespace MagemonkeysCartmoduleObserver;
     
        use MagentoFrameworkEventObserverInterface;
        use MagentoFrameworkAppRequestInterface;
     
        class AddPrice implements ObserverInterface
        {
            public function execute(MagentoFrameworkEventObserver $observer) {
                $item = $observer->getEvent()->getData('quote_item');         
                $item = ( $item->getParentItem() ? $item->getParentItem() : $item );
                $price = 50; // set custom price here
                $item->setCustomPrice($price);
                $item->setOriginalCustomPrice($price);
                $item->getProduct()->setIsSuperMode(true);
            }
     
        }
    ?>


    More/Less functionality in Magento2

    First of all, we need to create several files:

    touch app/design/frontend/<your_vendor_name>/<your_theme_name>/Magento_Catalog/layout/catalog_product_view.xml
    touch app/design/frontend/<your_vendor_name>/<your_theme_name>/requirejs-config.js
    touch app/design/frontend/<your_vendor_name>/<your_theme_name>/web/js/toggle-product-description.js
    touch app/design/frontend/<your_vendor_name>/<your_theme_name>/Magento_Catalog/templates/more-less.phtml
    touch app/design/frontend/<your_vendor_name>/<your_theme_name>/web/css/source/_theme.less

    Let’s review these files and see here description for each one regarding which code will be placed inside of them:

    requirejs-config.js

    Use this file to register your own JavaScript component:

    var config = {
        map: {
            "*": {
                // alias: path-to-corresponding-js-file
                toggleProductDescription: 'js/toggle-product-description'
            }
        }
    };

    catalog_product_view.xml

    Inside of the content  container, a new block is created with a specified template file that is going to be used:

    <?xml version="1.0"?>
    <page xmlns:xsi="http://www.w3.org/2001/XMLSchema-instance" xsi:noNamespaceSchemaLocation="urn:magento:framework:View/Layout/etc/page_configuration.xsd">    <body>
            <referenceContainer name="content">
                <block class="MagentoFrameworkViewElementTemplate" name="more-less-js" template="Magento_Catalog::more-less.phtml" />
            </referenceContainer>
        </body>
    </page>

    more-less.phtml

    This file contains the basic configuration of the more/less functionality.

    <script type="text/x-magento-init">
    {
        ".product.attribute.description .value":{
           "toggleProductDescription":{
                "contentMaxHeight": 200
            }
        }
    }
    </script>

    toggle-product-description.js

    Place all of your JavaScript logic in this file. Skeleton of such a JavaScript component should be like this:

    define([
    	"jquery", // declare your libraries, if you are using them
    ], function ($) { // delare library aliases
    	'use strict';
     
    	return function (config, node) {
    		var moreLess = {
    			button: {
    				el: $("<a>", {
    					id: "toggle-description",
    					href: "#"
    				}),
    				expanded_text: "- Less",
    				collapsed_text: "+ More"
    			},
    			target: {
    				el: $(node),
    				height: $(node).height(),
    				maxHeight: config.contentMaxHeight,
    				collapsedClassName: "collapsed",
    			}
    		};
    		
    		if (moreLess.target.height > moreLess.target.maxHeight) {
    		// update button text value
    			moreLess.button.el.text(moreLess.button.collapsed_text);
    		 
    			moreLess.target.el
    				// add css class to apply some styling
    				.addClass(moreLess.target.collapsedClassName)
    				// append link to product description
    				.parent().append(moreLess.button.el);
    		}
    		 
    		moreLess.button.el.on("click", function (e) {
    			e.preventDefault();
    		 
    			if (moreLess.target.el.hasClass(moreLess.target.collapsedClassName)) {
    				moreLess.target.el.removeClass(moreLess.target.collapsedClassName);
    				moreLess.button.el.text(moreLess.button.expanded_text);
    			} else {
    				moreLess.target.el.addClass(moreLess.target.collapsedClassName);
    				moreLess.button.el.text(moreLess.button.collapsed_text);
    			}
    		});
    	}
    });

    _theme.less

    This is an optional file for you to create, I have created some minimal styling (transparent-to-solid background) as a nice effect on the more/less button.

    .product.attribute.description .value{
      max-height: none;
      position: relative;
      max-height: none;
      border-bottom: 1px solid #d1d1d1;
     
      &.collapsed {
        max-height: 200px;
        overflow: hidden;
     
        &:after {
          content: "";
          position: absolute;
          width: 100%;
          height: 160px;
          z-index: 1;
          display: block;
          bottom: 0;
     
          background: -moz-linear-gradient(top, rgba(255,255,255,0) 0%, rgba(255,255,255,1) 70%, rgba(255,255,255,1) 100%); /* FF3.6-15 */
          background: -webkit-linear-gradient(top, rgba(255,255,255,0) 0%,rgba(255,255,255,1) 70%,rgba(255,255,255,1) 100%); /* Chrome10-25,Safari5.1-6 */
          background: linear-gradient(to bottom, rgba(255,255,255,0) 0%,rgba(255,255,255,1) 70%,rgba(255,255,255,1) 100%); /* W3C, IE10+, FF16+, Chrome26+, Opera12+, Safari7+ */
          filter: progid:DXImageTransform.Microsoft.gradient( startColorstr='#00ffffff', endColorstr='#ffffff',GradientType=0 ); /* IE6-9 */
        }
      }
    }
     
    #toggle-description {
      margin-top: 20px;
      display: inline-block;
    }

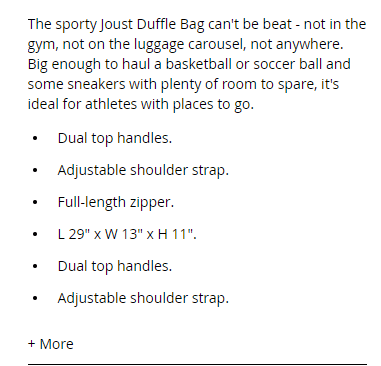
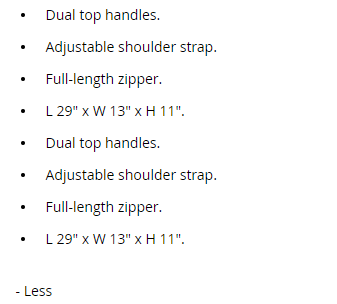
    Here is how it looks like on the frontend:

    How to open popup when tag onClick? – Magento2

    You can open popup when <a> tag onClick using below code:

    div>
        <a href="#" id="click-me">Click Me</a>
    </div>
    
    <div id="popup-modal" style="display:none;">
        <h1> Hi I'm here.... </h1>
    </div>
    
    <script>
        require(
            [
                'jquery',
                'Magento_Ui/js/modal/modal'
            ],
            function(
                $,
                modal
            ) {
                var options = {
                    type: 'popup',
                    responsive: true,
                    innerScroll: true,
                    title: 'popup modal title',
                    buttons: [{
                        text: $.mage.__('Continue'),
                        class: '',
                        click: function () {
                            this.closeModal();
                        }
                    }]
                };
    
                var popup = modal(options, $('#popup-modal'));
                $("#click-me").on('click',function(){ 
                    $("#popup-modal").modal("openModal");
                });
    
            }
        );
    </script>


    User Access Permission in Magento 2

    Sometimes you see the following error on the admin login page:

    “You need more permission to access this”,

    The fastest solution to resolve this issue is to create a new “admin” user and reset the previous user’s permissions.

    You can do it with the command line. Go to your Magento’s root directory and type:

    php bin/magento admin:user:create --admin-user='adminuser' --admin-password='adminuser@123' --admin-email='adminuser@domain.com' --admin-firstname='Admin' --admin-lastname='User'

    Through this command, it will create a new admin user with username “adminuser” and password “adminuser@123”. Then you need to login with this user and reset the previous user’s permissions.

    Magento2 Ajax Newsletter

    1. Create di.xml at app/code/Magemonkeys/AjaxNewsletter/etc/di.xml folder.
      <?xml version="1.0"?>
      <config xmlns:xsi="http://www.w3.org/2001/XMLSchema-instance" xsi:noNamespaceSchemaLocation="urn:magento:framework:ObjectManager/etc/config.xsd">
          <type name="MagentoNewsletterControllerSubscriberNewAction">
              <plugin name="Newsletter_Subscriber_NewAction"
                      type="MagemonkeysAjaxNewsletterControllerPluginSubscriberNewAction" sortOrder="10" disabled="false" />
          </type>
      </config>
    2. create NewAction.php at app/code/Magemonkeys/AjaxNewsletter/Controller/Plugin/Subscriber folder
      <?php
      /**
       *
       */
      namespace MagemonkeysAjaxNewsletterControllerPluginSubscriber;
       
      use MagentoCustomerApiAccountManagementInterface as CustomerAccountManagement;
      use MagentoCustomerModelSession;
      use MagentoCustomerModelUrl as CustomerUrl;
      use MagentoFrameworkAppActionContext;
      use MagentoStoreModelStoreManagerInterface;
      use MagentoNewsletterModelSubscriberFactory;
       
      /**
       * Class NewAction
       */
      class NewAction extends MagentoNewsletterControllerSubscriberNewAction
      {
          /**
           * @var CustomerAccountManagement
           */
          protected $customerAccountManagement;
       
          protected $resultJsonFactory;
       
          /**
           * Initialize dependencies.
           *
           * @param Context $context
           * @param SubscriberFactory $subscriberFactory
           * @param Session $customerSession
           * @param StoreManagerInterface $storeManager
           * @param CustomerUrl $customerUrl
           * @param CustomerAccountManagement $customerAccountManagement
           */
          public function __construct(
              Context $context,
              SubscriberFactory $subscriberFactory,
              Session $customerSession,
              StoreManagerInterface $storeManager,
              CustomerUrl $customerUrl,
              CustomerAccountManagement $customerAccountManagement,
              MagentoFrameworkControllerResultJsonFactory $resultJsonFactory
          ) {
              $this->customerAccountManagement = $customerAccountManagement;
              $this->resultJsonFactory = $resultJsonFactory;
              parent::__construct(
                  $context,
                  $subscriberFactory,
                  $customerSession,
                  $storeManager,
                  $customerUrl,
                  $customerAccountManagement
              );
          }
       
          /**
           * Retrieve available Order fields list
           *
           * @return array
           */
          public function aroundExecute($subject, $procede)
          {
              $response = [];
              if ($this->getRequest()->isPost() && $this->getRequest()->getPost('email')) {
                  $email = (string)$this->getRequest()->getPost('email');
       
                  try {
                      $this->validateEmailFormat($email);
                      $this->validateGuestSubscription();
                      $this->validateEmailAvailable($email);
       
                      $status = $this->_subscriberFactory->create()->subscribe($email);
                      if ($status == MagentoNewsletterModelSubscriber::STATUS_NOT_ACTIVE) {
                          $response = [
                              'status' => 'OK',
                              'msg' => 'The confirmation request has been sent.',
                          ];
                      } else {
                          $response = [
                              'status' => 'OK',
                              'msg' => 'Thank you for your subscription.',
                          ];
                      }
                  } catch (MagentoFrameworkExceptionLocalizedException $e) {
                      $response = [
                          'status' => 'ERROR',
                          'msg' => __('There was a problem with the subscription: %1', $e->getMessage()),
                      ];
                  } catch (Exception $e) {
                      $response = [
                          'status' => 'ERROR',
                          'msg' => __('Something went wrong with the subscription.'),
                      ];
                  }
              }
       
              return $this->resultJsonFactory->create()->setData($response);
          }
       
      }
    3. Make a copy of “vendor/magento/module-newsletter/view/frontend/templates/subscribe.phtml” and place it inside your Magento Theme (e.g. app/design/frontend/NAMESPACE/MY_CUSTOM_THEME/Magento_Newsletter/templates/subscribe.phtml
      Add the following javascript to the end of the subscribe.phtml:

      {
              "*": {
                  "js/newsletter_subscriber_ajax": { }
              }
          }
      
    4. Create newsletter_subscriber_ajax.js at app/design/frontend/NAMESPACE/MY_CUSTOM_THEME/web/js/ folder
    require.config({
        deps: [
            'jquery'
        ],
        callback: function ($) {
            var form = $('form.subscribe');
     
            form.submit(function(e) {
                if(form.validation('isValid')){
                    var email = $("#newsletter").val();
                    var url = form.attr('action');
                    var loadingMessage = $('#loading-message');
     
                    if(loadingMessage.length == 0) {
                        form.find('.control').append('<div id="loading-message" style="display:none;padding-top:10px;">&nbsp;</div>');
                        var loadingMessage = $('#loading-message');
                    }
     
                    e.preventDefault();
                    try{
                        loadingMessage.html('Submitting...').show();
                        $.ajax({
                            url: url,
                            dataType: 'json',
                            type: 'POST',
                            data: {email: email},
                            success: function (data){
                                if(data.status != "ERROR"){
                                    $('#newsletter').val('');
                                }
                                loadingMessage.html(data.msg);
                            },
                            complete: function(){
                                setTimeout(function(){
                                    loadingMessage.hide();
                                },5000);
                            }
                        });
                    } catch (e){
                        loadingMessage.html(e.message);
                    }
                }
                return false;
            });
        }
    })


    Overriding Helper class in Magento 1.9.X

    Let’s try overriding Mage_Checkout_Helper_Cart helper class in this article.

    Step 1 – Create a module in your local folder app/local/Magemonkeys/Checkout

    Step 2 – Register your module in etc/modules directory by creating Magemonkeys_Checkout.xml file with the following content:

    <?xml version="1.0"?>
    <config>
        <modules>
            <Magemonkeys_Checkout>
                <active>true</active>
                <codePool>local</codePool>           
            </Magemonkeys_Checkout>
        </modules>
    </config>

    Step 3 – Create a config.xml file inside your etc directory of your module directory app/local/Magemonkeys/Checkout/etc/config.xml with the following code:

    <?xml version="1.0"?>
        <config>
            <modules>
                <Magemonkeys_Checkout>
                    <version>0.0.1</version>
                </Magemonkeys_Checkout>
            </modules>
     
            <global>
               <helpers>
                  <checkout>
                      <rewrite>
                          <data>Magemonkeys_Checkout_Helper_Data</data>
                     </rewrite>
                  </checkout>
               </helpers>
            </global>
      </config>

    Step 4 – Create Data.php file in helper directory of your module directory app/local/Magemonkeys/Checkout/helper/Data.php with the following code snippet:

    <?php
    class Magemonkeys_Checkout_Helper_Data extends Mage_Checkout_Helper_Data
    {
       public function sendPaymentFailedEmail($checkout, $message, $checkoutType = 'onepage')
       {
           return false;
       }
       public function newCheckoutHelperFunction()
       {
            return 'Overridden checkout helper function'
       }
    }
    ?>

    Step 5 – You can call your new helper function in phtml file by using the following code:

    <?php
         echo $this->helper('checkout')->newCheckoutHelperFunction();
    ?>