You can call static block in your phtml file using below code.
<?php
 echo $block->getLayout()->createBlock('MagentoCmsBlockBlock')
 ->setBlockId('static_block_identifier')->toHtml();
?>
We sacrifice by not doing any other technology, so that you get the best of Magento.
We sacrifice by not doing any other technology, so that you get the best of Magento.
You can call static block in your phtml file using below code.
<?php
echo $block->getLayout()->createBlock('MagentoCmsBlockBlock')
->setBlockId('static_block_identifier')->toHtml();
?>
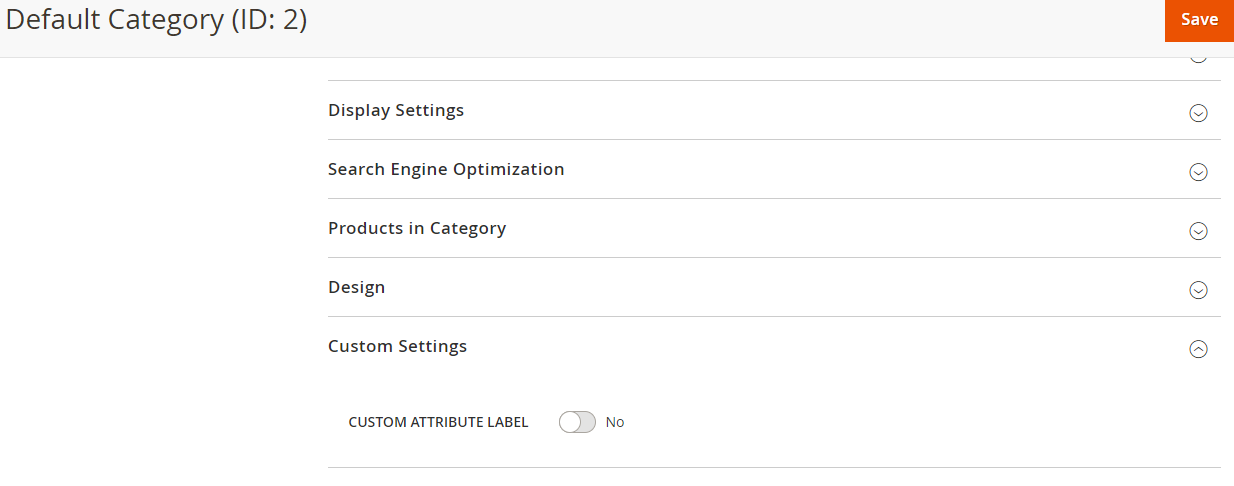
Here, we will discuss about how to add custom attribute in Magento 2 Category section.
I have created a custom module to add boolean type custom attribute.
Here, I have used MageMonkey as vendor and CustomCategorySettings as the module name.
Please follow below steps:
1. Create MageMonkey/CustomCategorySettings directories in app/code
2. Create registration.php file at app/code/MageMonkey/CustomCategorySettings/ and add following code:
<?php
MagentoFrameworkComponentComponentRegistrar::register(
    MagentoFrameworkComponentComponentRegistrar::MODULE,
    'MageMonkey_CustomCategorySettings',
    __DIR__
);
3. Create module.xml file at app/code/MageMonkey/CustomCategorySettings/etc/ and add following code:
<config xmlns:xsi="http://www.w3.org/2001/XMLSchema-instance" xsi:noNamespaceSchemaLocation="urn:magento:framework:Module/etc/module.xsd">
    <module name="MageMonkey_CustomCategorySettings" setup_version="1.0.0">
        <sequence>
            <module name="Magento_Catalog"/>
        </sequence>
    </module>
</config>
4. Create InstallData.php file at app/code/MageMonkey/CustomCategorySettings/Setup/ and add following code:
<?php
namespace MageMonkeyCustomCategorySettingsSetup;
use MagentoFrameworkModuleSetupMigration;
use MagentoFrameworkSetupInstallDataInterface;
use MagentoFrameworkSetupModuleContextInterface;
use MagentoFrameworkSetupModuleDataSetupInterface;
use MagentoCatalogSetupCategorySetupFactory;

class InstallData implements InstallDataInterface
{
    /**
     * Category setup factory
     *
     * @var CategorySetupFactory
     */
    private $categorySetupFactory;

    /**
     * Init
     *
     * @param CategorySetupFactory $categorySetupFactory
     */
    public function __construct(CategorySetupFactory $categorySetupFactory)
    {
        $this->categorySetupFactory = $categorySetupFactory;
    }
    /**
     * {@inheritdoc}
     * @SuppressWarnings(PHPMD.ExcessiveMethodLength)
     */
    public function install(ModuleDataSetupInterface $setup, ModuleContextInterface $context)
    {
        $installer = $setup;
        $installer->startSetup();

        $categorySetup = $this->categorySetupFactory->create(['setup' => $setup]);
        $entityTypeId = $categorySetup->getEntityTypeId(MagentoCatalogModelCategory::ENTITY);
        $attributeSetId = $categorySetup->getDefaultAttributeSetId($entityTypeId);
        $categorySetup->removeAttribute(
        MagentoCatalogModelCategory::ENTITY, 'CUSTOM_ATTRIBUTE' );
        $categorySetup->addAttribute(
        MagentoCatalogModelCategory::ENTITY, 'CUSTOM_ATTRIBUTE', [
             'type' => 'int',
             'label' => 'CUSTOM ATTRIBUTE LABEL',
             'input' => 'boolean',
             'source' => 'MagentoEavModelEntityAttributeSourceBoolean',
             'required' => false,
             'global' => MagentoEavModelEntityAttributeScopedAttributeInterface::SCOPE_STORE,
             'group' => 'Custom Settings',
            ]
        );
$installer->endSetup();
    }
}
5. Create category_form.xml file at app/code/MageMonkey/CustomCategorySettings/view/adminhtml/ui_component/ and add following code:
<?xml version="1.0" encoding="UTF-8"?>
<form xmlns:xsi="http://www.w3.org/2001/XMLSchema-instance"
      xsi:noNamespaceSchemaLocation="urn:magento:module:Magento_Ui:etc/ui_configuration.xsd">
    <fieldset name="custom_settings">
        <argument name="data" xsi:type="array">
            <item name="config" xsi:type="array">
                <item name="label" xsi:type="string">Custom Settings</item>
                <item name="collapsible" xsi:type="boolean">true</item>
                <item name="sortOrder" xsi:type="number">99</item>
            </item>
        </argument>
        <field name="CUSTOM_ATTRIBUTE">
            <argument name="data" xsi:type="array">
                <item name="config" xsi:type="array">
                    <item name="dataType" xsi:type="string">boolean</item>
                    <item name="formElement" xsi:type="string">checkbox</item>
                    <item name="label" xsi:type="string" translate="true">CUSTOM ATTRIBUTE LABEL</item>
                    <item name="prefer" xsi:type="string">toggle</item>
                    <item name="valueMap" xsi:type="array">
                        <item name="true" xsi:type="string">1</item>
                        <item name="false" xsi:type="string">0</item>
                    </item>
                    <item name="default" xsi:type="number">0</item>
                </item>
            </argument>
        </field>
    </fieldset>
</form>
6. Run following commands to enable this custom module.
php bin/magento setup:upgrade
php bin/magento cache:clean
php bin/magento cache:flush
Now, you can see in Magento 2 Admin > Catalog > Category
There will be a tab group “Custom Settings” in admin category as shown below.
Here we are discussing to update the cart without clicking the Update Cart Button.
Or we can say ajax cart update.
I have created a custom module to implement such functionality.
Here I have used MageMonkey as vendor and AutoUpdateCartAjax as the module name.
Please follow the below steps:
1. Create MageMonkey/AutoUpdateCartAjax directories in app/code.
2. Create registration.php file at app/code/MageMonkey/AutoUpdateCartAjax and add following code:
<?php
MagentoFrameworkComponentComponentRegistrar::register(
    MagentoFrameworkComponentComponentRegistrar::MODULE,
    'MageMonkey_AutoUpdateCartAjax',
    __DIR__
);
3. Create module.xml file at app/code/MageMonkey/AutoUpdateCartAjax/etc/ and add following code:
<?xml version="1.0"?>
<config xmlns:xsi="http://www.w3.org/2001/XMLSchema-instance" xsi:noNamespaceSchemaLocation="urn:magento:framework:Module/etc/module.xsd">
    <module name="MageMonkey_AutoUpdateCartAjax" setup_version="1.0.0" />
</config>
4. Create checkout_cart_index.xml file at app/code/MageMonkey/AutoUpdateCartAjax/view/frontend/layout and add following code:
<page xmlns:xsi="http://www.w3.org/2001/XMLSchema-instance" layout="1column" xsi:noNamespaceSchemaLocation="urn:magento:framework:View/Layout/etc/page_configuration.xsd">
    <body>
        <referenceContainer name="content">
            <block class="MagentoFrameworkViewElementTemplate" name="cart.auto.update.qty"  template="MageMonkey_AutoUpdateCartAjax::js.phtml" after="-"/>
        </referenceContainer>
    </body>
</page>
5. Create js.phtml file at app/code/MageMonkey/AutoUpdateCartAjax/view/frontend/templates and add following code:
<script>
    require ([
            'jquery'
        ],
        function ($) {
            $(window).on("load", function () {
                require([
                    'MageMonkey_AutoUpdateCartAjax/js/cartQtyUpdate'
                ]);
            });
        });
</script>
6. Create cartQtyUpdate.js file at app/code/MageMonkey/AutoUpdateCartAjax/view/frontend/web/js and add following code:
define([
    'jquery',
    'Magento_Checkout/js/action/get-totals',
    'Magento_Customer/js/customer-data'
], function ($, getTotalsAction, customerData) {

    $(document).ready(function(){
        $(document).on('change', 'input[name$="[qty]"]', function(){
            var form = $('form#form-validate');
            $.ajax({
                url: form.attr('action'),
                data: form.serialize(),
                showLoader: true,
                success: function (res) {
                    var parsedResponse = $.parseHTML(res);
                    var result = $(parsedResponse).find("#form-validate");
                    var sections = ['cart'];

                    $("#form-validate").replaceWith(result);

                    /* Minicart reloading */
                    customerData.reload(sections, true);

                    /* Totals summary reloading */
                    var deferred = $.Deferred();
                    getTotalsAction([], deferred);
                },
                error: function (xhr, status, error) {
                    var err = eval("(" + xhr.responseText + ")");
                    console.log(err.Message);
                }
            });
        });
    });
});
7. Create requirejs-config.js file at app/code/MageMonkey/AutoUpdateCartAjax/view/frontend/ and add following code:
var config = {
    map: {
        '*': {
            ajaxQty: 'MageMonkey_AutoUpdateCartAjax/js/cartQtyUpdate'
        }
    }
};
8. Run below commands to enable this custom module.
php bin/magento setup:upgrade
php bin/magento cache:clean
php bin/magento cache:flush
Now, you can check your cart page. If you increase or decrease quantity, it will auto-update cart total and mini cart.
CONTACT US to get Magento programming solutions by hiring a certified Magento expert.
I need to get order collection between specific date range passing start date and end date in Magento 2. For that I used filter created_at field using addAttributeToFilter().
First create Block file By default created_at field in sales_order table represent the time of order creation:
<?php
namespace VenderModulenameBlock;
class OrderRange extends MagentoFrameworkViewElementTemplate
{
 public function __construct(
 MagentoFrameworkViewElementTemplateContext $context,
 MagentoSalesModelResourceModelOrderCollectionFactory $orderCollectionFactory,
 array $data = []
 ) {
 $this->orderCollectionFactory = $orderCollectionFactory;
 parent::__construct($context, $data);
 }

 /* Here Create Function For Order collection between start and end date */
 public function getOrderCollectionByDateRange(){
 $startDate = date("Y-m-d h:i:s",strtotime('0000-00-00')); // start date
 $endDate = date("Y-m-d h:i:s", strtotime('0000-00-00')); // end date

 $orders = $this->orderCollectionFactory->create()
 ->addAttributeToFilter('created_at', array('from'=>$startDate, 'to'=>$endDate));
 return $orders;
 }
?>
After do this You need to call this function in any custom template file or any exsting template,
if($orders->getTotalCount() > 0) {
 foreach($orders as $_order) {
 echo "<pre>";print_r($_order); echo "</pre>";
 }
}
Now you can get Order collection by date range.
If you want to display brand attribute value in the product view page, You can use the following code:
<referenceContainer name="product.info.main">
    <block class="MagentoCatalogBlockProductViewDescription" name="product.info.brand" template="product/view/attribute.phtml" before="-">
        <arguments>
            <argument name="at_call" xsi:type="string">getBrand</argument>
            <argument name="at_code" xsi:type="string">brand</argument>
            <argument name="css_class" xsi:type="string">brand</argument>
            <argument name="at_label" xsi:type="string">none</argument>
            <argument name="add_attribute" xsi:type="string">itemprop="brand"</argument>
        </arguments>
    </block>
</referenceContainer>
Also If you need to display text before this attribute value in the product page something like:
Brand: Apple
For that you need to change ‘none’ to ‘default’ as shown below in ‘at_label’ :
From:
<argument name="at_label" xsi:type="string">none</argument>
To:
<argument name="at_label" xsi:type="string">default</argument>
Now you can see product attribute value with it’s label in the product page.
Default Magento comes with various functionality along with some helper text which makes that functionality easier to understand for the users.
As the name suggests, Helper text is designed to help the users and default Magento contains builtin “attribute” class that let you add comment or note easily beside the option for the better understanding to product users.
Here, I share the Easiest way to add your own comment along with product attribute, all you need to add the following code to InstallData.php file which is available at below path:
appcodeVendorExtensionSetupInstallData.php
<?php
namespace VendorpExtensionSetup;
use MagentoEavSetupEavSetupFactory;
use MagentoFrameworkSetupInstallDataInterface;
use MagentoFrameworkSetupModuleContextInterface;
use MagentoFrameworkSetupModuleDataSetupInterface;

class InstallData implements InstallDataInterface
{
	private $eavSetupFactory;
	public function __construct(EavSetupFactory $eavSetupFactory)
	{
               $this->eavSetupFactory = $eavSetupFactory;
	}

           public function install(ModuleDataSetupInterface $setup, ModuleContextInterface $context)
	{
               $setup->startSetup();

               $eavSetup = $this->eavSetupFactory->create(['setup' => $setup]);
               $eavSetup->addAttribute(
                                           	MagentoCatalogModelProduct::ENTITY,
                                           	'your_attribute_id',
                                           	[
                                                           	'type' => 'text',
                                                           	'label' => 'Attribute Label',
                                                           	'input' => 'text',
                                                           	'required' => false,
                                                           	'sort_order' => 4,
                                                           	'global' => MagentoEavModelEntityAttributeScopedAttributeInterface::SCOPE_GLOBAL,
                                                           	'group' => 'Attribute Groupe',
                                                           	'note' => 'Attribute Comment'
                                           	]
                           	);
       $setup->endSetup();
	}
}
Hope this blog will help you to add comment text for product attributes.
Follow below step to create a new table in Magento 2 Database.
<?php
namespace VenderModulenameSetup;

use MagentoFrameworkSetupInstallSchemaInterface;
use MagentoFrameworkSetupModuleContextInterface;
use MagentoFrameworkSetupSchemaSetupInterface;

class InstallSchema implements InstallSchemaInterface
{

    public function install(
        SchemaSetupInterface $setup,
        ModuleContextInterface $context
    ) {

        $tableobj = $setup->getConnection()->newTable($setup->getTable('contact_info'));

        $tableobj->addColumn(
            'entity_id',
            MagentoFrameworkDBDdlTable::TYPE_INTEGER,
            null,
            ['identity' => true,'nullable' => false,'primary' => true,'unsigned' => true,],
            'Entity ID'
        );

        $tableobj->addColumn(
            'first_name',
            MagentoFrameworkDBDdlTable::TYPE_TEXT,
            50,
            [],
            'first_name'
        );

        $tableobj->addColumn(
            'last_name',
            MagentoFrameworkDBDdlTable::TYPE_TEXT,
            50,
            [],
            'last_name'
        );

        $tableobj->addColumn(
            'phone',
            MagentoFrameworkDBDdlTable::TYPE_TEXT,
            15,
            [],
            'phone'
        );

        $tableobj->addColumn(
            'email',
            MagentoFrameworkDBDdlTable::TYPE_TEXT,
            50,
            [],
            'email'
        );

        $setup->getConnection()->createTable($tableobj);
    }
}
Magento ver. 2.2.2 on an iOS device, go to a product page that contains an image in the fotorama gallery.
The expected result would be the image for the product in the fotorama gallery box. When I click on the close icon on an iPhone or iPad nothing happens. Hooked the device to my iMac to debug and there are no errors visible in the console.
I fixed this issue with below steps, let’s check it here.
Override gallery.js in your custom theme at app/design///web/fotorama/gallery.js.
You can copy this file from /lib/web/mage/gallery/gallery.js and replace code as mentioned below.
From:
if (this.isTouchEnabled) {
   this.settings.$element.on('tap', '.fotorama__stage__frame',
   function () {
    var translate = getTranslate($(this).parents('.fotorama__stage__shaft'));

    if (translate[1] === '0' && !$(this).hasClass('fotorama-video-container')) {
        self.openFullScreen();
        self.settings.$pageWrapper.hide();
    }
   });
}
To:
if (this.isTouchEnabled && this.settings.isFullscreen) {
            this.settings.$element.on('tap', '.fotorama__stage__frame', function () {
                var translate = getTranslate($(this).parents('.fotorama__stage__shaft'));

                if (translate[1] === '0' && !$(this).hasClass('fotorama-video-container')) {
                   self.openFullScreen();
                   self.settings.$pageWrapper.hide();
                }
            });
        }
This problem is based on lib/web/mage/gallery/gallery.js file.
Follow below steps to display configurable product specific attribute values count on product listing page in Magento 2.
First, you need to override vendor/magento/module-catalog/Block/Product/ListProduct.php file in your existing module.
To override this file:
Create new file ‘di.xml’ at this path -> app/code/Vender/Modulename/etc/. Add the following code in this new file:
 <?xml version="1.0"?>
<config xmlns:xsi="http://www.w3.org/2001/XMLSchema-instance" xsi:noNamespaceSchemaLocation="urn:magento:framework:ObjectManager/etc/config.xsd">
<preference for="MagentoCatalogBlockProductListProduct" type="VenderModulenameBlockProductListProduct" />
</config>
Then create a new file named ‘ListProduct.php’ at app/code/Vender/Modulename/Block/Product/.
Add the following code in this new file:
<?php
namespace VenderModulenameBlockProduct;

class ListProduct extends MagentoCatalogBlockProductListProduct {

public function getProductDetailsHtml(MagentoCatalogModelProduct $product) {
       $html = '';
       $renderer = $this->getDetailsRenderer($product->getTypeId());
        if ($renderer) {
            if ($product->getTypeId() == MagentoConfigurableProductModelProductTypeConfigurable::TYPE_CODE) {
                $options = array();
                $productColor = array();
                $data = $product->getTypeInstance()->getConfigurableOptions($product);
                foreach ($data as $attr) {
                    foreach ($attr as $p) {

                        if ($p['attribute_code'] == 'color') {
                            if (!in_array($p['option_title'], $productColor)) {
                                $productColor[] = $p['option_title'];
                            }
                        }
                    }
                 }
                $html = '<p> ' . count($productColor) . ' </p>';
             }
             $renderer->setProduct($product);
             return $html . $renderer->toHtml();
         }
         return '';
     }

}

?>
Create module.xml file at app/code/Magemonkeys/RewriteProduct/etc and add the following code inside this file:
<?xml version="1.0"?>
<config xmlns:xsi="http://www.w3.org/2001/XMLSchema-instance" xsi:noNamespaceSchemaLocation="urn:magento:framework:Module/etc/module.xsd">
<module name="Magemonkeys_RewriteProduct" setup_version="1.0.1">
</module>
</config>
Create registration.php file at app/code/Magemonkeys/RewriteProduct and add the following code inside this file:
<?php

MagentoFrameworkComponentComponentRegistrar::register(
MagentoFrameworkComponentComponentRegistrar::MODULE,
'Magemonkeys_RewriteProduct',
__DIR__
);
Create di.xml file at app/code/Magemonkeys/RewriteProduct/etc in order to specify which model to override by using <preference for=””> and <preference type=””>.
Add the following code inside dl.xml file: The purpose of creating this file is to override di.xml file
<?xml version="1.0"?>
<config xmlns:xsi="http://www.w3.org/2001/XMLSchema-instance" xsi:noNamespaceSchemaLocation="urn:magento:framework:ObjectManager/etc/config.xsd">
<preference for="MagentoCatalogModelProduct" type="MagemonkeysRewriteProductModelCatalogProduct" />
</config>
Now, create Product.php file at app/code/Magemonkeys/RewriteProduct/Model/Catalog and add the following code in this file.
<?php

namespace MagemonkeysRewriteProductModelCatalog;

class Product extends MagentoCatalogModelProduct

{
   public function getName()
   {
       return $this->_getData(self::NAME) . ' + Override Model - Name';
   }

public function getSku()
   {
       return "123-Override Model - Sku";
   }
}
Run the following commands in the Magento 2 root directory:
php bin/magento module:enable Magemonkeys_RewriteProduct
php bin/magento setup:upgrade
php bin/magento setup:di:compile
php bin/magento cache:clean
php bin/magento cache:flush
Now, it’s time to check the result!
Go to the product page and you should see as below:


But here we are again to tell you, we are the best in Magento and no one can
serve you better in Magento than us.
We offer magento certified developers.
Our magento clientele is 500+.
We sign NDA for the security of your projects.
We’ve performed 100+ Magento migration projects.
Free quotation on your project.
Three months warranty on code developed by us.


