Here, we will discuss about how to add custom attribute in Magento 2 Category section.
I have created a custom module to add boolean type custom attribute.
Here, I have used MageMonkey as vendor and CustomCategorySettings as the module name.
Please follow below steps:
1. Create MageMonkey/CustomCategorySettings directories in app/code
2. Create registration.php file at app/code/MageMonkey/CustomCategorySettings/ and add following code:
<?php
MagentoFrameworkComponentComponentRegistrar::register(
    MagentoFrameworkComponentComponentRegistrar::MODULE,
    'MageMonkey_CustomCategorySettings',
    __DIR__
);
3. Create module.xml file at app/code/MageMonkey/CustomCategorySettings/etc/ and add following code:
<config xmlns:xsi="http://www.w3.org/2001/XMLSchema-instance" xsi:noNamespaceSchemaLocation="urn:magento:framework:Module/etc/module.xsd">
    <module name="MageMonkey_CustomCategorySettings" setup_version="1.0.0">
        <sequence>
            <module name="Magento_Catalog"/>
        </sequence>
    </module>
</config>
4. Create InstallData.php file at app/code/MageMonkey/CustomCategorySettings/Setup/ and add following code:
<?php
namespace MageMonkeyCustomCategorySettingsSetup;
use MagentoFrameworkModuleSetupMigration;
use MagentoFrameworkSetupInstallDataInterface;
use MagentoFrameworkSetupModuleContextInterface;
use MagentoFrameworkSetupModuleDataSetupInterface;
use MagentoCatalogSetupCategorySetupFactory;

class InstallData implements InstallDataInterface
{
    /**
     * Category setup factory
     *
     * @var CategorySetupFactory
     */
    private $categorySetupFactory;

    /**
     * Init
     *
     * @param CategorySetupFactory $categorySetupFactory
     */
    public function __construct(CategorySetupFactory $categorySetupFactory)
    {
        $this->categorySetupFactory = $categorySetupFactory;
    }
    /**
     * {@inheritdoc}
     * @SuppressWarnings(PHPMD.ExcessiveMethodLength)
     */
    public function install(ModuleDataSetupInterface $setup, ModuleContextInterface $context)
    {
        $installer = $setup;
        $installer->startSetup();

        $categorySetup = $this->categorySetupFactory->create(['setup' => $setup]);
        $entityTypeId = $categorySetup->getEntityTypeId(MagentoCatalogModelCategory::ENTITY);
        $attributeSetId = $categorySetup->getDefaultAttributeSetId($entityTypeId);
        $categorySetup->removeAttribute(
        MagentoCatalogModelCategory::ENTITY, 'CUSTOM_ATTRIBUTE' );
        $categorySetup->addAttribute(
        MagentoCatalogModelCategory::ENTITY, 'CUSTOM_ATTRIBUTE', [
             'type' => 'int',
             'label' => 'CUSTOM ATTRIBUTE LABEL',
             'input' => 'boolean',
             'source' => 'MagentoEavModelEntityAttributeSourceBoolean',
             'required' => false,
             'global' => MagentoEavModelEntityAttributeScopedAttributeInterface::SCOPE_STORE,
             'group' => 'Custom Settings',
            ]
        );
$installer->endSetup();
    }
}
5. Create category_form.xml file at app/code/MageMonkey/CustomCategorySettings/view/adminhtml/ui_component/ and add following code:
<?xml version="1.0" encoding="UTF-8"?>
<form xmlns:xsi="http://www.w3.org/2001/XMLSchema-instance"
      xsi:noNamespaceSchemaLocation="urn:magento:module:Magento_Ui:etc/ui_configuration.xsd">
    <fieldset name="custom_settings">
        <argument name="data" xsi:type="array">
            <item name="config" xsi:type="array">
                <item name="label" xsi:type="string">Custom Settings</item>
                <item name="collapsible" xsi:type="boolean">true</item>
                <item name="sortOrder" xsi:type="number">99</item>
            </item>
        </argument>
        <field name="CUSTOM_ATTRIBUTE">
            <argument name="data" xsi:type="array">
                <item name="config" xsi:type="array">
                    <item name="dataType" xsi:type="string">boolean</item>
                    <item name="formElement" xsi:type="string">checkbox</item>
                    <item name="label" xsi:type="string" translate="true">CUSTOM ATTRIBUTE LABEL</item>
                    <item name="prefer" xsi:type="string">toggle</item>
                    <item name="valueMap" xsi:type="array">
                        <item name="true" xsi:type="string">1</item>
                        <item name="false" xsi:type="string">0</item>
                    </item>
                    <item name="default" xsi:type="number">0</item>
                </item>
            </argument>
        </field>
    </fieldset>
</form>
6. Run following commands to enable this custom module.
php bin/magento setup:upgrade
php bin/magento cache:clean
php bin/magento cache:flush
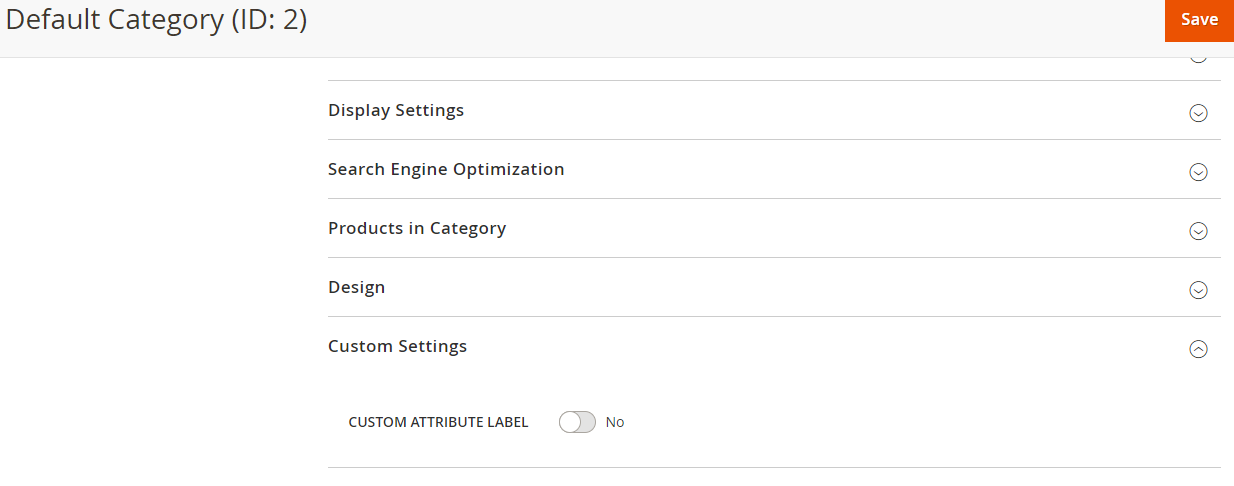
Now, you can see in Magento 2 Admin > Catalog > Category
There will be a tab group “Custom Settings” in admin category as shown below.