We sacrifice by not doing any other technology, so that you get the best of Magento.

We sacrifice by not doing any other technology, so that you get the best of Magento.

    How I solved shipping method table rates file import issue in Magento 2?

    I recently faced a technical issue while doing development in windows environment.

    I tried to import shipping method rates & table rates in Magento 2.

    That action threw me an error which said,

    “The file “C:/Windows/Temp/E:/wamp/tmp/php9B36.tmp” doesn’t exist”

    I audit my code again and found everything was correct. But then I realized, that I was working in windows environment.

    The default upload file temp directory set in php.ini by WAMP is accurate location.But, I changed it to this setting.

    I found this line:

    upload_tmp_dir = "E:/wamp/tmp"

    & change it with this characters:

    upload_tmp_dir = "C:/Windows/Temp"

    Then, I saved the file & restart apache.

    After uploading the file, it worked for me. VOILA!

    Magento 2: Get list of website programmatically

    If you need lists of websites in template file then follow below steps:

    Add one block file(GetWebsiteList.php) in your existing module and paste below code:

    <?php 
    namespace VendernameModulenameBlock; 
    class GetWebsiteList extends MagentoFrameworkViewElementTemplate 
    { 
        public function __construct( 
            MagentoFrameworkViewElementTemplateContext $context, 
            MagentoStoreModelResourceModelWebsiteCollectionFactory $websiteCollectionFactory, 
            array $data = [] ) 
        {
            $this->_websiteCollectionFactory = $websiteCollectionFactory;
            parent::__construct($context, $data);
        }
    
         /**
         * Retrieve websites collection of system
         *
         * @return Website Collection
         */
        public function getWebsiteLists()
        {
            $collection = $this->_websiteCollectionFactory->create();
            return $collection;
        }
    }
    

    Call in the template file,

    <?php foreach($block->getWebsiteLists() as $website) {
    	echo $website->getCode(); //code of website
    	echo $website->getName(); //name of website
    	print_r($website->getData());
    }

    How to truncate reviews, products, customers, & orders tables in Magento 2?

    Before firing below queries, I advice you to take backup of your database. Because, it’s always a good habit to save your data.

    I performed an audit on all tables.
    Below list of the tables should be truncated, if you wish to clear test data.

    SET FOREIGN_KEY_CHECKS = 0;

    Truncate order tables

    TRUNCATE TABLE `gift_message`;
    TRUNCATE TABLE `quote`;
    TRUNCATE TABLE `quote_address`;
    TRUNCATE TABLE `quote_address_item`;
    TRUNCATE TABLE `quote_id_mask`;
    TRUNCATE TABLE `quote_item`;
    TRUNCATE TABLE `quote_item_option`;
    TRUNCATE TABLE `quote_payment`;
    TRUNCATE TABLE `quote_shipping_rate`;
    TRUNCATE TABLE `reporting_orders`;
    TRUNCATE TABLE `sales_bestsellers_aggregated_daily`;
    TRUNCATE TABLE `sales_bestsellers_aggregated_monthly`;
    TRUNCATE TABLE `sales_bestsellers_aggregated_yearly`;
    TRUNCATE TABLE `sales_creditmemo`;
    TRUNCATE TABLE `sales_creditmemo_comment`;
    TRUNCATE TABLE `sales_creditmemo_grid`;
    TRUNCATE TABLE `sales_creditmemo_item`;
    TRUNCATE TABLE `sales_invoice`;
    TRUNCATE TABLE `sales_invoiced_aggregated`;
    TRUNCATE TABLE `sales_invoiced_aggregated_order`;
    TRUNCATE TABLE `sales_invoice_comment`;
    TRUNCATE TABLE `sales_invoice_grid`;
    TRUNCATE TABLE `sales_invoice_item`;
    TRUNCATE TABLE `sales_order`;
    TRUNCATE TABLE `sales_order_address`;
    TRUNCATE TABLE `sales_order_aggregated_created`;
    TRUNCATE TABLE `sales_order_aggregated_updated`;
    TRUNCATE TABLE `sales_order_grid`;
    TRUNCATE TABLE `sales_order_item`;
    TRUNCATE TABLE `sales_order_payment`;
    TRUNCATE TABLE `sales_order_status_history`;
    TRUNCATE TABLE `sales_order_tax`;
    TRUNCATE TABLE `sales_order_tax_item`;
    TRUNCATE TABLE `sales_payment_transaction`;
    TRUNCATE TABLE `sales_refunded_aggregated`;
    TRUNCATE TABLE `sales_refunded_aggregated_order`;
    TRUNCATE TABLE `sales_shipment`;
    TRUNCATE TABLE `sales_shipment_comment`;
    TRUNCATE TABLE `sales_shipment_grid`;
    TRUNCATE TABLE `sales_shipment_item`;
    TRUNCATE TABLE `sales_shipment_track`;
    TRUNCATE TABLE `sales_shipping_aggregated`;
    TRUNCATE TABLE `sales_shipping_aggregated_order`;
    TRUNCATE TABLE `tax_order_aggregated_created`;
    TRUNCATE TABLE `tax_order_aggregated_updated`;

    Truncate Customer tables

    TRUNCATE TABLE `customer_address_entity`;
    TRUNCATE TABLE `customer_address_entity_datetime`;
    TRUNCATE TABLE `customer_address_entity_decimal`;
    TRUNCATE TABLE `customer_address_entity_int`;
    TRUNCATE TABLE `customer_address_entity_text`;
    TRUNCATE TABLE `customer_address_entity_varchar`;
    TRUNCATE TABLE `customer_entity`;
    TRUNCATE TABLE `customer_entity_datetime`;
    TRUNCATE TABLE `customer_entity_decimal`;
    TRUNCATE TABLE `customer_entity_int`;
    TRUNCATE TABLE `customer_entity_text`;
    TRUNCATE TABLE `customer_entity_varchar`;
    TRUNCATE TABLE `customer_grid_flat`;
    TRUNCATE TABLE `customer_log`;
    TRUNCATE TABLE `customer_log`;
    TRUNCATE TABLE `customer_visitor`;
    TRUNCATE TABLE `persistent_session`;
    TRUNCATE TABLE `wishlist`;
    TRUNCATE TABLE `wishlist_item`;
    TRUNCATE TABLE `wishlist_item_option`;

    Truncate Review tables

    TRUNCATE TABLE `review`;
    TRUNCATE TABLE `review_detail`;
    TRUNCATE TABLE `review_entity_summary`;
    TRUNCATE TABLE `review_store`;

    Truncate Product tables

    TRUNCATE TABLE `cataloginventory_stock_item`;
    TRUNCATE TABLE `cataloginventory_stock_status`;
    TRUNCATE TABLE `cataloginventory_stock_status_idx`;
    TRUNCATE TABLE `cataloginventory_stock_status_tmp`;
    TRUNCATE TABLE `catalog_category_product`;
    TRUNCATE TABLE `catalog_category_product_index`;
    TRUNCATE TABLE `catalog_category_product_index_tmp`;
    TRUNCATE TABLE `catalog_compare_item`;
    TRUNCATE TABLE `catalog_product_bundle_option`;
    TRUNCATE TABLE `catalog_product_bundle_option_value`;
    TRUNCATE TABLE `catalog_product_bundle_price_index`;
    TRUNCATE TABLE `catalog_product_bundle_selection`;
    TRUNCATE TABLE `catalog_product_bundle_selection_price`;
    TRUNCATE TABLE `catalog_product_bundle_stock_index`;
    TRUNCATE TABLE `catalog_product_entity`;
    TRUNCATE TABLE `catalog_product_entity_datetime`;
    TRUNCATE TABLE `catalog_product_entity_decimal`;
    TRUNCATE TABLE `catalog_product_entity_gallery`;
    TRUNCATE TABLE `catalog_product_entity_int`;
    TRUNCATE TABLE `catalog_product_entity_media_gallery`;
    TRUNCATE TABLE `catalog_product_entity_media_gallery_value`;
    TRUNCATE TABLE `catalog_product_entity_media_gallery_value_to_entity`;
    TRUNCATE TABLE `catalog_product_entity_media_gallery_value_video`;
    TRUNCATE TABLE `catalog_product_entity_text`;
    TRUNCATE TABLE `catalog_product_entity_tier_price`;
    TRUNCATE TABLE `catalog_product_entity_varchar`;
    TRUNCATE TABLE `catalog_product_index_eav`;
    TRUNCATE TABLE `catalog_product_index_eav_decimal`;
    TRUNCATE TABLE `catalog_product_index_eav_decimal_idx`;
    TRUNCATE TABLE `catalog_product_index_eav_decimal_tmp`;
    TRUNCATE TABLE `catalog_product_index_eav_idx`;
    TRUNCATE TABLE `catalog_product_index_eav_tmp`;
    TRUNCATE TABLE `catalog_product_index_price`;
    TRUNCATE TABLE `catalog_product_index_price_bundle_idx`;
    TRUNCATE TABLE `catalog_product_index_price_bundle_opt_idx`;
    TRUNCATE TABLE `catalog_product_index_price_bundle_opt_tmp`;
    TRUNCATE TABLE `catalog_product_index_price_bundle_sel_idx`;
    TRUNCATE TABLE `catalog_product_index_price_bundle_sel_tmp`;
    TRUNCATE TABLE `catalog_product_index_price_bundle_tmp`;
    TRUNCATE TABLE `catalog_product_index_price_cfg_opt_agr_idx`;
    TRUNCATE TABLE `catalog_product_index_price_cfg_opt_agr_tmp`;
    TRUNCATE TABLE `catalog_product_index_price_cfg_opt_idx`;
    TRUNCATE TABLE `catalog_product_index_price_cfg_opt_tmp`;
    TRUNCATE TABLE `catalog_product_index_price_downlod_idx`;
    TRUNCATE TABLE `catalog_product_index_price_downlod_tmp`;
    TRUNCATE TABLE `catalog_product_index_price_final_idx`;
    TRUNCATE TABLE `catalog_product_index_price_final_tmp`;
    TRUNCATE TABLE `catalog_product_index_price_idx`;
    TRUNCATE TABLE `catalog_product_index_price_opt_agr_idx`;
    TRUNCATE TABLE `catalog_product_index_price_opt_agr_tmp`;
    TRUNCATE TABLE `catalog_product_index_price_opt_idx`;
    TRUNCATE TABLE `catalog_product_index_price_opt_tmp`;
    TRUNCATE TABLE `catalog_product_index_price_tmp`;
    TRUNCATE TABLE `catalog_product_index_tier_price`;
    TRUNCATE TABLE `catalog_product_index_website`;
    TRUNCATE TABLE `catalog_product_link`;
    TRUNCATE TABLE `catalog_product_link_attribute_decimal`;
    TRUNCATE TABLE `catalog_product_link_attribute_int`;
    TRUNCATE TABLE `catalog_product_link_attribute_varchar`;
    TRUNCATE TABLE `catalog_product_option`;
    TRUNCATE TABLE `catalog_product_option_price`;
    TRUNCATE TABLE `catalog_product_option_title`;
    TRUNCATE TABLE `catalog_product_option_type_price`;
    TRUNCATE TABLE `catalog_product_option_type_title`;
    TRUNCATE TABLE `catalog_product_option_type_value`;
    TRUNCATE TABLE `catalog_product_relation`;
    TRUNCATE TABLE `catalog_product_super_attribute`;
    TRUNCATE TABLE `catalog_product_super_attribute_label`;
    TRUNCATE TABLE `catalog_product_super_link`;
    TRUNCATE TABLE `catalog_product_website`;
    TRUNCATE TABLE `catalog_url_rewrite_product_category`;
    TRUNCATE TABLE `downloadable_link`;
    TRUNCATE TABLE `downloadable_link_price`;
    TRUNCATE TABLE `downloadable_link_purchased`;
    TRUNCATE TABLE `downloadable_link_purchased_item`;
    TRUNCATE TABLE `downloadable_link_title`;
    TRUNCATE TABLE `downloadable_sample`;
    TRUNCATE TABLE `downloadable_sample_title`;
    TRUNCATE TABLE `product_alert_price`;
    TRUNCATE TABLE `product_alert_stock`;
    TRUNCATE TABLE `report_compared_product_index`;
    TRUNCATE TABLE `report_viewed_product_aggregated_daily`;
    TRUNCATE TABLE `report_viewed_product_aggregated_monthly`;
    TRUNCATE TABLE `report_viewed_product_aggregated_yearly`;
    TRUNCATE TABLE `report_viewed_product_index`;


    SET FOREIGN_KEY_CHECKS = 1;


    Overriding Block in Magento 1.9.X

    Well, We created a very simple custom module that will override the core product listing block (app/code/core/Mage/Catalog/Block/Category/View.php) in the category known as page view.

    Our first step should be to create one module file. Create a file ‘app/etc/modules/Namespace_Catalog.xml’ and paste the below content into that file:

    <?xml version="1.0"?>
    <config>
      <modules>
        <Namespace_Catalog>
          <active>true</active>
          <codePool>local</codePool>
        </Namespace_Catalog>
      </modules>
    </config>

    Next, we have to create a module configuration file. Create “app/code/local/Namespace/Catalog/etc/config.xml” and paste the below contents in that file.

    <?xml version="1.0"?>
    <config>
      <modules>
        <Namespace_Catalog>
          <version>1.0</version>
        </Namespace_Catalog>
      </modules>
     
      <global>
        <blocks>
          <catalog>
            <rewrite>
              <category_view>Namespace_Catalog_Block_Category_View</category_view>
            </rewrite>
          </catalog>
        </blocks>
      </global>
    </config>

    At the starting point of module, we’ve done a set-up of the module’s version no. by using <version> tag. Following to it, the <catalog> and <rewrite> tags are utilized to override. So Magento system knows that we’re going to override one of the “blocks” of the “Catalog” core module.

    The <category_view> tag is utilized to define the identity of the block and that will be overridden by the Namespace_Catalog_Block_Category_View class. It’s mapped to a block file “Category/View.php” under the “Block” directory of the Catalog module.

    The last step will be to define a block class Namespace_Catalog_Block_Category_View. Let’s create a block file “app/code/local/Namespace/Catalog/Block/Category/View.php” and paste the below code in that file:

    <?php
    class Namespace_Catalog_Block_Category_View extends Mage_Catalog_Block_Category_View
    {
      public function getProductListHtml()
      {
        /** Your Custom Code Goes Here **/
        return $this­>getChildHtml('product_list');
      }
    }

    We have defined the Namespace_Catalog_Block_Category_View class which extends the core Mage_Catalog_Block_Category_View block class. Thus, you can easily override the method of the base class and create new methods when required.

    Magento 2: How to reset orders, customers, reviews and products

    If you need to reset data of orders, customers, reviews and products in magento 2 using mysql queries then follow below steps:

    Reset order tables

    SET FOREIGN_KEY_CHECKS = 0;
    TRUNCATE TABLE `gift_message`;
    TRUNCATE TABLE `quote`;
    TRUNCATE TABLE `quote_address`;
    TRUNCATE TABLE `quote_address_item`;
    TRUNCATE TABLE `quote_id_mask`;
    TRUNCATE TABLE `quote_item`;
    TRUNCATE TABLE `quote_item_option`;
    TRUNCATE TABLE `quote_payment`;
    TRUNCATE TABLE `quote_shipping_rate`;
    TRUNCATE TABLE `reporting_orders`;
    TRUNCATE TABLE `sales_bestsellers_aggregated_daily`;
    TRUNCATE TABLE `sales_bestsellers_aggregated_monthly`;
    TRUNCATE TABLE `sales_bestsellers_aggregated_yearly`;
    TRUNCATE TABLE `sales_creditmemo`;
    TRUNCATE TABLE `sales_creditmemo_comment`;
    TRUNCATE TABLE `sales_creditmemo_grid`;
    TRUNCATE TABLE `sales_creditmemo_item`;
    TRUNCATE TABLE `sales_invoice`;
    TRUNCATE TABLE `sales_invoiced_aggregated`;
    TRUNCATE TABLE `sales_invoiced_aggregated_order`;
    TRUNCATE TABLE `sales_invoice_comment`;
    TRUNCATE TABLE `sales_invoice_grid`;
    TRUNCATE TABLE `sales_invoice_item`;
    TRUNCATE TABLE `sales_order`;
    TRUNCATE TABLE `sales_order_address`;
    TRUNCATE TABLE `sales_order_aggregated_created`;
    TRUNCATE TABLE `sales_order_aggregated_updated`;
    TRUNCATE TABLE `sales_order_grid`;
    TRUNCATE TABLE `sales_order_item`;
    TRUNCATE TABLE `sales_order_payment`;
    TRUNCATE TABLE `sales_order_status_history`;
    TRUNCATE TABLE `sales_order_tax`;
    TRUNCATE TABLE `sales_order_tax_item`;
    TRUNCATE TABLE `sales_payment_transaction`;
    TRUNCATE TABLE `sales_refunded_aggregated`;
    TRUNCATE TABLE `sales_refunded_aggregated_order`;
    TRUNCATE TABLE `sales_shipment`;
    TRUNCATE TABLE `sales_shipment_comment`;
    TRUNCATE TABLE `sales_shipment_grid`;
    TRUNCATE TABLE `sales_shipment_item`;
    TRUNCATE TABLE `sales_shipment_track`;
    TRUNCATE TABLE `sales_shipping_aggregated`;
    TRUNCATE TABLE `sales_shipping_aggregated_order`;
    TRUNCATE TABLE `tax_order_aggregated_created`;
    TRUNCATE TABLE `tax_order_aggregated_updated`;
    SET FOREIGN_KEY_CHECKS = 1;
    

    Reset Customer tables

    SET FOREIGN_KEY_CHECKS = 0;
    TRUNCATE TABLE `customer_address_entity`;
    TRUNCATE TABLE `customer_address_entity_datetime`;
    TRUNCATE TABLE `customer_address_entity_decimal`;
    TRUNCATE TABLE `customer_address_entity_int`;
    TRUNCATE TABLE `customer_address_entity_text`;
    TRUNCATE TABLE `customer_address_entity_varchar`;
    TRUNCATE TABLE `customer_entity`;
    TRUNCATE TABLE `customer_entity_datetime`;
    TRUNCATE TABLE `customer_entity_decimal`;
    TRUNCATE TABLE `customer_entity_int`;
    TRUNCATE TABLE `customer_entity_text`;
    TRUNCATE TABLE `customer_entity_varchar`;
    TRUNCATE TABLE `customer_grid_flat`;
    TRUNCATE TABLE `customer_log`;
    TRUNCATE TABLE `customer_log`;
    TRUNCATE TABLE `customer_visitor`;
    TRUNCATE TABLE `persistent_session`;
    TRUNCATE TABLE `wishlist`;
    TRUNCATE TABLE `wishlist_item`;
    TRUNCATE TABLE `wishlist_item_option`;
    SET FOREIGN_KEY_CHECKS = 1;

    Reset Review tables

    SET FOREIGN_KEY_CHECKS = 0;
    TRUNCATE TABLE `review`;
    TRUNCATE TABLE `review_detail`;
    TRUNCATE TABLE `review_entity_summary`;
    TRUNCATE TABLE `review_store`;
    SET FOREIGN_KEY_CHECKS = 1;

    Reset Product tables

    SET FOREIGN_KEY_CHECKS = 0;
    TRUNCATE TABLE `cataloginventory_stock_item`;
    TRUNCATE TABLE `cataloginventory_stock_status`;
    TRUNCATE TABLE `cataloginventory_stock_status_idx`;
    TRUNCATE TABLE `cataloginventory_stock_status_tmp`;
    TRUNCATE TABLE `catalog_category_product`;
    TRUNCATE TABLE `catalog_category_product_index`;
    TRUNCATE TABLE `catalog_category_product_index_tmp`;
    TRUNCATE TABLE `catalog_compare_item`;
    TRUNCATE TABLE `catalog_product_bundle_option`;
    TRUNCATE TABLE `catalog_product_bundle_option_value`;
    TRUNCATE TABLE `catalog_product_bundle_price_index`;
    TRUNCATE TABLE `catalog_product_bundle_selection`;
    TRUNCATE TABLE `catalog_product_bundle_selection_price`;
    TRUNCATE TABLE `catalog_product_bundle_stock_index`;
    TRUNCATE TABLE `catalog_product_entity`;
    TRUNCATE TABLE `catalog_product_entity_datetime`;
    TRUNCATE TABLE `catalog_product_entity_decimal`;
    TRUNCATE TABLE `catalog_product_entity_gallery`;
    TRUNCATE TABLE `catalog_product_entity_int`;
    TRUNCATE TABLE `catalog_product_entity_media_gallery`;
    TRUNCATE TABLE `catalog_product_entity_media_gallery_value`;
    TRUNCATE TABLE `catalog_product_entity_media_gallery_value_to_entity`;
    TRUNCATE TABLE `catalog_product_entity_media_gallery_value_video`;
    TRUNCATE TABLE `catalog_product_entity_text`;
    TRUNCATE TABLE `catalog_product_entity_tier_price`;
    TRUNCATE TABLE `catalog_product_entity_varchar`;
    TRUNCATE TABLE `catalog_product_index_eav`;
    TRUNCATE TABLE `catalog_product_index_eav_decimal`;
    TRUNCATE TABLE `catalog_product_index_eav_decimal_idx`;
    TRUNCATE TABLE `catalog_product_index_eav_decimal_tmp`;
    TRUNCATE TABLE `catalog_product_index_eav_idx`;
    TRUNCATE TABLE `catalog_product_index_eav_tmp`;
    TRUNCATE TABLE `catalog_product_index_price`;
    TRUNCATE TABLE `catalog_product_index_price_bundle_idx`;
    TRUNCATE TABLE `catalog_product_index_price_bundle_opt_idx`;
    TRUNCATE TABLE `catalog_product_index_price_bundle_opt_tmp`;
    TRUNCATE TABLE `catalog_product_index_price_bundle_sel_idx`;
    TRUNCATE TABLE `catalog_product_index_price_bundle_sel_tmp`;
    TRUNCATE TABLE `catalog_product_index_price_bundle_tmp`;
    TRUNCATE TABLE `catalog_product_index_price_cfg_opt_agr_idx`;
    TRUNCATE TABLE `catalog_product_index_price_cfg_opt_agr_tmp`;
    TRUNCATE TABLE `catalog_product_index_price_cfg_opt_idx`;
    TRUNCATE TABLE `catalog_product_index_price_cfg_opt_tmp`;
    TRUNCATE TABLE `catalog_product_index_price_downlod_idx`;
    TRUNCATE TABLE `catalog_product_index_price_downlod_tmp`;
    TRUNCATE TABLE `catalog_product_index_price_final_idx`;
    TRUNCATE TABLE `catalog_product_index_price_final_tmp`;
    TRUNCATE TABLE `catalog_product_index_price_idx`;
    TRUNCATE TABLE `catalog_product_index_price_opt_agr_idx`;
    TRUNCATE TABLE `catalog_product_index_price_opt_agr_tmp`;
    TRUNCATE TABLE `catalog_product_index_price_opt_idx`;
    TRUNCATE TABLE `catalog_product_index_price_opt_tmp`;
    TRUNCATE TABLE `catalog_product_index_price_tmp`;
    TRUNCATE TABLE `catalog_product_index_tier_price`;
    TRUNCATE TABLE `catalog_product_index_website`;
    TRUNCATE TABLE `catalog_product_link`;
    TRUNCATE TABLE `catalog_product_link_attribute_decimal`;
    TRUNCATE TABLE `catalog_product_link_attribute_int`;
    TRUNCATE TABLE `catalog_product_link_attribute_varchar`;
    TRUNCATE TABLE `catalog_product_option`;
    TRUNCATE TABLE `catalog_product_option_price`;
    TRUNCATE TABLE `catalog_product_option_title`;
    TRUNCATE TABLE `catalog_product_option_type_price`;
    TRUNCATE TABLE `catalog_product_option_type_title`;
    TRUNCATE TABLE `catalog_product_option_type_value`;
    TRUNCATE TABLE `catalog_product_relation`;
    TRUNCATE TABLE `catalog_product_super_attribute`;
    TRUNCATE TABLE `catalog_product_super_attribute_label`;
    TRUNCATE TABLE `catalog_product_super_link`;
    TRUNCATE TABLE `catalog_product_website`;
    TRUNCATE TABLE `catalog_url_rewrite_product_category`;
    TRUNCATE TABLE `downloadable_link`;
    TRUNCATE TABLE `downloadable_link_price`;
    TRUNCATE TABLE `downloadable_link_purchased`;
    TRUNCATE TABLE `downloadable_link_purchased_item`;
    TRUNCATE TABLE `downloadable_link_title`;
    TRUNCATE TABLE `downloadable_sample`;
    TRUNCATE TABLE `downloadable_sample_title`;
    TRUNCATE TABLE `product_alert_price`;
    TRUNCATE TABLE `product_alert_stock`;
    TRUNCATE TABLE `report_compared_product_index`;
    TRUNCATE TABLE `report_viewed_product_aggregated_daily`;
    TRUNCATE TABLE `report_viewed_product_aggregated_monthly`;
    TRUNCATE TABLE `report_viewed_product_aggregated_yearly`;
    TRUNCATE TABLE `report_viewed_product_index`;
    SET FOREIGN_KEY_CHECKS = 1;

    How to move checkout buttons to order review on desktop view and to the bottom on mobile view?

    Let’s start with the plan of what we need to do. I would like to keep the buttons in the same place on mobile, at the bottom of the page. So my plan will be to just hide them on the desktop via styles. So on the desktop, I need to hide the original buttons, add new buttons to the order summary block, but I also need to detect when I should show the Next button and when I should show the  Place Order button. In this case, I will need to add a couple of methods to my code.

    Template

    Let’s focus first on templates, so we know how to look at the problem. We will need to add two buttons to the summary.html file. I will copy summary.html file into vendor/vendor-name/theme-name/Magento_Checkout/web/template/ where “vendor-name“, “theme-name” needs to be replaced with your name of vendor and theme name. For this example, I am adding a file into a theme. In order to overwrite this file via the module, you need to update XML file, but I will not talk about it now.

    summary.html

    At this point, I will copy summary.html into the path mentioned above and add custom code as below:

    <div class="opc-block-summary" data-bind="blockLoader: isLoading">
        <span data-bind="i18n: 'Order Summary'" class="title"></span>
        <!-- ko foreach: elems() -->
        <!-- ko template: getTemplate() --><!-- /ko -->
        <!-- /ko -->
    </div>
    <!-- ko if: (isVisibleShippingButton()) -->
    <div class="actions-toolbar-trigger" id="continue-to-payment-trigger-wrapper">
        <div class="primary">
            <button type="button" id="continue-to-payment-trigger" class="button action continue primary">
                <span><!-- ko i18n: 'Next'--><!-- /ko --></span>
            </button>
        </div>
    </div>
    <!-- /ko -->
    <!-- ko if: (isVisiblePaymentButton()) -->
    <div class="actions-toolbar-trigger" id="place-order-trigger-wrapper">
        <button type="button" class="button action primary" id="place-order-trigger">
            <span><!-- ko i18n: 'Place Order'--><!-- /ko --></span>
        </button>
    </div>
    <!-- /ko -->

    Let’s analyze the code I have added. The first part is default Magento, however, the two next ones are mine.

    <!-- ko if: (isVisibleShippingButton()) -->
    <div class="actions-toolbar-trigger" id="continue-to-payment-trigger-wrapper">
        <div class="primary">
            <button type="button" id="continue-to-payment-trigger" class="button action continue primary">
                <span><!-- ko i18n: 'Next'--><!-- /ko --></span>
            </button>
        </div>
    </div>
    <!-- /ko -->

    First of all, I have added the method isVisibleShippingButton() which I still need to create, however this method will detect if I should show the Next button or if it is the payment step and I shouldn’t show it. I also created a special wrapper with id "continue-to-payment-trigger-wrapper" and added a button which is pretty much the same as the default ones, I just added id "continue-to-payment-trigger" which I will use later on as well.

    <!-- ko if: (isVisiblePaymentButton()) -->
    <div class="actions-toolbar-trigger" id="place-order-trigger-wrapper">
        <button type="button" class="button action primary" id="place-order-trigger">
            <span><!-- ko i18n: 'Place Order'--><!-- /ko --></span>
        </button>
    </div>
    <!-- /ko -->

    A really similar story over here. I have added the method isVisiblePaymentButton() which I will create later on. I have added a wrapper with id "place-order-trigger-wrapper" and button with id "place-order-trigger" which I will use later on.

    Javascript

    My next step will be to create missing methods and actions. As I have added code into summary.html I will extend the summary.js file.

    requirejs-config.js

    We will use Javascript Mixins as we want to add new methods to the class and augment the behavior of the base class by adding different mixins to it.

    It is really important to add this file into the correct place. It should be added to vendor/vendor-name/module-name/view/frontend/ or vendor/vendor-name/theme-name/module-nameor vendor/vendor-name/theme-name/ where “vendor-name“, “theme-name” and “module-name” needs to be replaced with your name of vendor, theme and module name. If you are not creating a new module, you can follow the second example and use the Magento_Checkout module in your theme for this case as we make an implementation into the checkout part. Another solution would be to follow the third example and add files directly into your theme.

    Whichever solution you will choose, requirejs-config.js needs to be in the root folder of the module, theme or theme module. As soon as you choose one way, you need to follow it.

    Solution 1

    Let’s say we will add our file to vendor/vendor-name/module-name/view/frontend/ or vendor/vendor-name/theme-name/module-name/,  our file should look like the one below:

    var config = {
        config: {
            mixins: {
                'Magento_Checkout/js/view/summary': {
                    'Vendor_Module/js/view/summary-mixin': true
                }
            }
        }
    };

    Solution 2

    In case you decide to choose the last solution vendor/vendor-name/theme-name/,  your file should look like the following:

    var config = {
        config: {
            mixins: {
                'Magento_Checkout/js/view/summary': {
                    'js/view/summary-mixin': true
                }
            }
        }
    };

    summary-mixin.js

    At this point, we will add our new file summary-mixin.js. The new file will be added to vendor/vendor-name/module-name/view/frontend/web/js/ or vendor/vendor-name/theme-name/module-name/web/js/ or vendor/vendor-name/theme-name/web/js/ where “vendor-name“, “theme-name” and “module-name” needs to be replaced with your name of vendor, theme and module name. If you are not creating a new module, you can follow the second example and use the Magento_Checkout module in your theme for this case, as we make an implementation into the checkout part. Another solution would be to follow the third example and add files directly into your theme. Your decision depends on where you have added requirejs-config.js file.

    define([
        'jquery',
        'jquery/ui',
        'ko',
        'Magento_Checkout/js/model/step-navigator'
    ], function($, ui, ko, stepNavigator){
        'use strict';
        var mixin = {
            isVisibleShippingButton: function () {
                return !stepNavigator.getActiveItemIndex();
            },
            
            isVisiblePaymentButton: function () {
                return stepNavigator.getActiveItemIndex();
            },
    
            initialize: function () {
                var self = this;
                
                $(function() {
                    $('body').on('click', '#continue-to-payment-trigger', function () {
                        $('#shipping-method-buttons-container').find('.action.continue.primary').trigger('click');
                    });                     
                    $('body').on('click', '#place-order-trigger', function () {
                        $('.payment-method._active').find('.action.primary.checkout').trigger('click');
                    });
                });
    
                this._super();
            }
        };
    
        return function (target) {
            return target.extend(mixin);
        };
    });

    Let’s analyze this code. I have been following the Magento 2 documentation JavaScript Mixins where I wanted to add a mixin module that extends the target component with new functions.

    'jquery',
    'jquery/ui',
    'ko',
    'Magento_Checkout/js/model/step-navigator'

    These are references to certain functions which I will use in the code.

    $, ui, ko, stepNavigator

    These are aliases to the functions above.

    isVisibleShippingButton and isVisiblePaymentButton

    These are the two missing methods which return a value, certain values based on stepNavigator.getActiveItemIndex() which return 0 for shipping step and 1 for payment step.

    In the next part of the code, I trigger click action on the original button after clicking my custom buttons.

    this._super();

    At this point, I return the original code of the initialize method.

    return function (target) {
        return target.extend(mixin);
    };

    This part is the default Magento method to extend targeted function by our mixins.

    Styling

    The last thing which we need to do is add styling to hide buttons depending on the resolution of the screen. You can add it to any of the styling files in your module, or your theme. For example you can use vendor/vendor-name/module-name/view/frontend/web/css/source/_module.less for modules.

    _module.less or _order-summary.less

    I have decided to use Magento_Checkout/web/css/source/module/checkout/_order-summary.less in my theme and added following code:

    .media-width(@extremum, @break) when (@extremum = 'max') and (@break = @screen__m) {
        .custom-slide.opc-summary-wrapper {
            .modal-inner-wrap {
                .actions-toolbar-trigger {
                    display: none;
                }
            }
        }
    }
    .media-width(@extremum, @break) when (@extremum = 'min') and (@break = @screen__m) {
        .checkout-payment-method,
        .checkout-shipping-method {
            .actions-toolbar {
                display: none;
            }
        }
    }

    I just hide buttons in certain parts on desktop and mobile. That’s it!
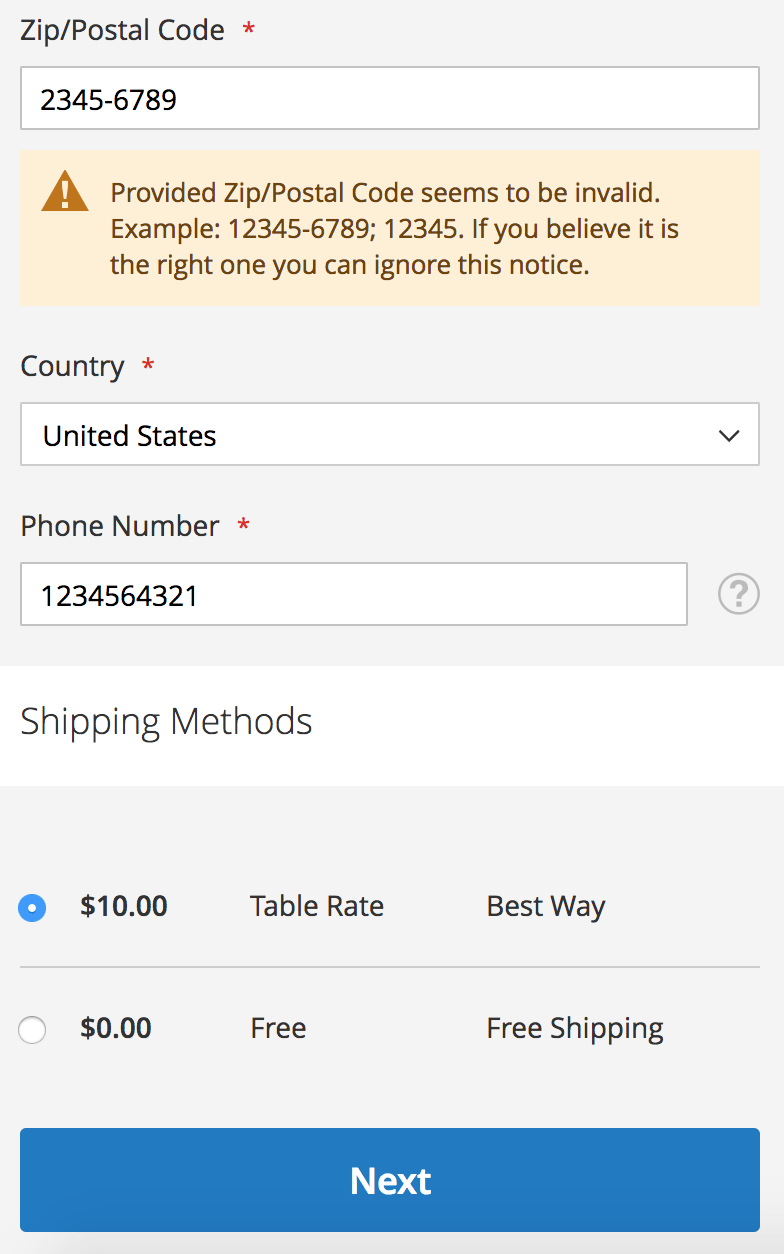
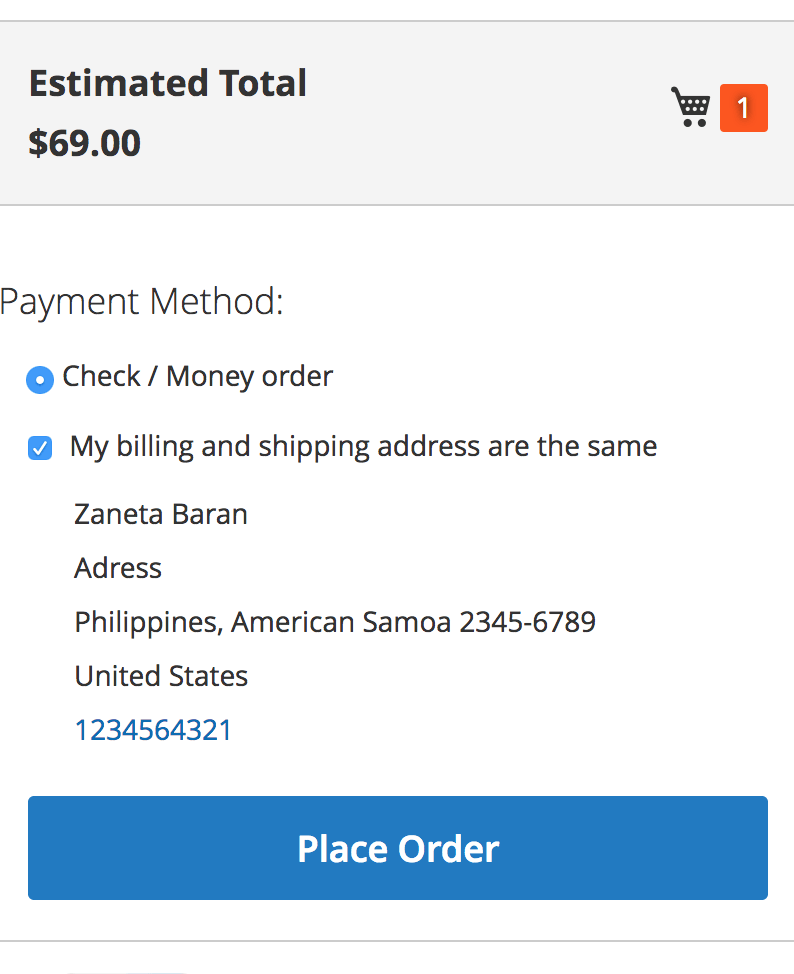
    Result

    I have taken some screenshots of our implementations based on the Luma theme. I have not added any styling so this is how it will be displayed by default.

    Desktop

    Mobile

    How to show subtotals in first checkout step?

    Basically, Magento doesn’t provide functionality to enable total summary in shipping step. So we have to change some of the files.
    Let’s follow below steps:

    Step 1: To enable summary, you need to override below file.

    app/code/Magento/Checkout/view/frontend/web/js/view/summary/abstract-total.js

    Override isFullMode() function

    isFullMode: function() {
                if (!this.getTotals()) {
                    return false;
                }
               // return stepNavigator.isProcessed('shipping');
                return true;
            }


    Step:2 To change shipping price value on selection of the shipping method. You can override the following file.

    app/code/Magento/Checkout/view/frontend/web/js/view/summary/shipping.js

    Change getValue() function.

    getValue: function() {
    
                    if (!this.isCalculated()) {
                        return this.notCalculatedMessage;
                    }
                    //var price =  this.totals().shipping_amount; /* comment this line and add below two lines. */
                     var shippingMethod = quote.shippingMethod();
                    var price =  shippingMethod.amount;
                    return this.getFormattedPrice(price);
                }


    How To Make The Most Of Videos In Your Magento Commerce Store

    Today, video content is playing an important role in the world of e-commerce. It’s everywhere like our TV’s, social media channels, and even in the product pages on the e-commerce website. You have to agree that we all enjoy watching videos regularly given it any time of the day.

    Advertisers know the power of a video and how it influences consumers buying behaviour. But, doing it in a straight way is not something everyone knows. So, here is our guide which on how to make the most of video on your Magento eCommerce website.

    Visual information contains movements and it is the best way to connect with your customers.

    Some Fact about Videos:

    Before we start, let’s first understand what exactly Video does:

    • A visual experience delivers some content which text can never.
    • We give instant reaction to movements and videos do attract us in many ways.
    • We can get the sense of a visual scene in 1/10 of a second
    • The brain can receive 90% of the transmitted visual information.
    • Our brain can process to videos 60000 times faster than the text.
    • Videos are anytime more enjoyable for everyone as it is easier to deliver the message.
    • Our brain responds faster to the videos like if someone is smiling in the video then we also smile, same goes for laughing, crying and so on.

    It is clear that video content does play a significant role in attracting your customers. Retailers aim to spread awareness for particular products and this way they can generate conversions for specific items along with brand in general.

    Thus, it is very important that eCommerce videos show individual goods, key product information, that’s put into “real-life” context. Because, if people want to buy something from you then they would like to know how it works in the real world by real buyers, as they will just not rely on company’s opinion of how great the product may be.

    Now you may wonder about creating some amazing product videos?

    But…

    How can you create A Great Product Video?

    Creating a video depends upon the retailer’s target audience as every company would opt for different methods of creating successful product video.

    Some of the key principles of each retailer should be taken into account and they are:

    1. Context is the Key

    You need to show your product from customer’s perspective as it is for them and they would like to know how it will benefit them and contributes to a better life. So, customer reviews are the best way to increase both traffic as well as conversions for your website. Hence, it is proven that customers prefer watching videos and so with watching reviews.

    2. Make it like a Show and Tell

    Always keep your product simple especially when if it’s the first time. Choose the correct time, show them what it is and make a note of key features. Showcase how they can use it and how it will make their life better. Stick to your rules of a show and tell and everything will be simple.

    3. Customer Stories

    Once they are aware of your product then the audience would like to see some real-life examples so that they can connect with your product. You need to include customer-driven content which describes properly about its usage and the overall experience with the product. If your product is new in the market then you will not have any customer testimonials to show so in that case, you can share stories of the people behind the product. They will tell their experience of how they had created it and what their intentions behind it and this way your audience can understand the product.

    4. Branding

    Everything about the product matters. The video is not just an advertisement for your product but its more about the brand itself. Make a point that your content is produced to high standards and it looks professional and you can do it by customising it with your logo and taglines. When your product video is created then all you have to do is to sit back and see some of the many benefits will come heaving through to your business.

    Now let us know some key benefits of Video in eCommerce Sites

    1. Virtual Demonstration

    A video gives an in-depth information about the product and customers want to see the proof of everything they are buying so if your product videos are doing good by using the above mentioned 4 steps then you will be able to give them all the proof which they want to see before buying your product as videos eliminates all customer doubts.

    How it Eliminate Consumer Doubt?

    A customer always prefer buying the high-quality product and a video exactly tell them in detail about everything they wish to know and this is how you build trust with your audience especially for start-up companies it is very important to tell them a story of your product as well as the brand. A great tool to connect with them directly.

    2. Boost Rankings in Search Results

    Videos look rich and relevant content will make your SEO also better. All you have to do is to make it correctly with a clear description and appropriate title and also a transcript which shows that your page has information that people are looking for in their search engines.

    If you upload a product video in different channels like YouTube or Instagram then you are creating some additional backlinks to your website so these views and share on applications will increase the value of your content.

    3. Increase Conversions

    When you add a video in your website or in various channels then you are likely to see new users adding the product to their backed increases massively. You may also find a number of conversions increases rapidly. Want to see proof?

    • 96% of customers thought that videos made their decision strong of buying a product online much easier.
    • When the product includes video content, some companies have seen the sales jumped up from 6% to 30%.
    • 144% of customers would prefer buying online they would have watched a product video.

    4. Build Trust by Increased Engagement

    A user cannot touch a product when they are shopping online so it is important for you to show them someone else handling, this will change their mind and increase your sales. Show them what product looks from different angles and the size of it in comparison to the demonstrator’s hands. Overall, you are providing them with a better idea of the product they are buying and features compare to a static image.

    5. Less Number of Product Returns

    If the user is getting a better picture of a product then they are less likely to be disappointed with it. Product videos reduce return rates by 25%. It is also true that you have to do your research before filming to make sure lighting, set up, etc does not give any judgement and wrongly interpret your product. If you want the video to look great when you need to make sure that you showcase everything true about the product.

    We suggest: Videoly

    Videoly will help you create a high-quality video content that you can easily promote on social channels, which you can share through emails and on your site’s blog. It automatically embedding videos to your product pages, Videoly gives you richer product information, a enhance customer experience and also boost sales.

    Add a video to your Magento site and see how simple it is to increase your conversions when paired with product descriptions and imagery.

    Is Your Magento Admin Panel Secure?

    One of the most essential parts of any Magento store is its Admin panel. Admin panel allows you to see customers and their orders. You can put in products and change their pricing. So basically you can follow, change and perform a day-to-day business activity.

    A hacker can gain valuable information for spam campaigns or can change the payment page to get credit card details for fraudulent purposes. In such cases, a breach of the admin part can be a little difficult and expensive. It might also result in large fines that can even force a website to cease trading.

    For this purpose, there is password protection and other option available to have the admin panel on a non-standard website URL. But do you think this is enough?

    In some cases, search engines know your admin URL allowing it to be found with a very simple web search. There are a few reasons this can happen but ultimately they boil down to the admin URL becoming visible in the frontend and a search engine following the link. Unfortunately, the admin area doesn’t have a “NOINDEX, NOFOLLOW” meta tag so the page is indexed for search.

    “A search engine knows your Magento Admin URL”

    We strongly recommend restricting admin access to limited IP addresses. You can do that, by three sources that you can use to compromise the security of your website.

    Hackers can enter through Magento Connect downloader so you need to change the connect manager URL in order protect your site. Hacker might get confused if you specify a completely different path. You can restrict the access to/downloader/ location by IP address through the .htaccess file.

    If you don’t want users to access the RSS feed then you can limit this feature because it has been seen in recent times that hackers make a force attacks through RSS feeds. You can create IP whitelisting that will redirect the request from classified visitors to the main page.

    You need to have tight security for your Magento admin panel. You can even block IP addresses from all other countries and this restriction truly works if you know your consumers are fellow citizens.

    If you value your customer’s privacy, which you should, you should take every measure possible to protect access to this data. Obscuring the admin URL isn’t enough. Two Factor authentication modules are available which require your password and something else to log in (perhaps a Google authenticator key), you can secure the admin so it can only be accessed from specific locations (IP addresses). We also recommend that in Magento Commerce/Enterprise you review the admin logs periodically to ensure no suspicious login activity is happening.

    Magento 2: Magento 2.2.6 “Clear Shopping Cart” button not working on cart page

    I have encountered that in Magento 2.2.6 “Clear Shopping Cart” button is not working on cart page.

    I have found out that in vendor/magento/module-checkout/view/frontend/templates/cart/form.phtml -line 27, Magento Team seems missed to put a dot for the ‘action’ classname.

    <table id="shopping-cart-table"
    class="cart items data table"
    data-mage-init='{"shoppingCart":{"emptyCartButton": "action.clear",
    "updateCartActionContainer": "#update_cart_action_container"}}'>

    Replace above code with below code:

    <table id="shopping-cart-table"
    class="cart items data table"
    data-mage-init='{"shoppingCart":{"emptyCartButton": ".action.clear",
    "updateCartActionContainer": "#update_cart_action_container"}}'>

    It’s a small bug that creates a big problem.

    Hopefully, this will be fixed in next release.