Please follow below steps to disable cache for block :
– layout cache disable:-
1) You can use cacheable=”false” attribute in your layout to disable cache for a block but problem is that it will disable whole page cache.
Here, we have passed the ‘coupon_code’ variable in the template vars.
This variable contains the unique coupon code for every subscriber. Also, we have used the object Manager but you can use the construct method. And we have passed the static RULE id in the code. You can also change the rule id.
By default Magento bundle product display min price on the listing page and full price on the product page.
Today I’m sharing you the list page to show the same price as the product page because it’s confusing for customers when they see the different prices.
You have to override below file in your appropriate theme:
Now replace the current price variable to $finalPrice [like $_minimalPriceTax its depend on tax settings you have to find excet condition which is a call for your list page]
For example, I am replacing below line:
Old Line : <?php echo $_coreHelper->currency($_minimalPriceTax) ?>
The COVID pandemic disturbed many business plans we had for the year. The next half we have left in 2020 will go down in recovering the loss of the first half.
Various new trends have started emerging which would mature and reach their true potential by 2021. By exploring these trends in the remaining half of 2020, you can make great progress and start 2021 in style.
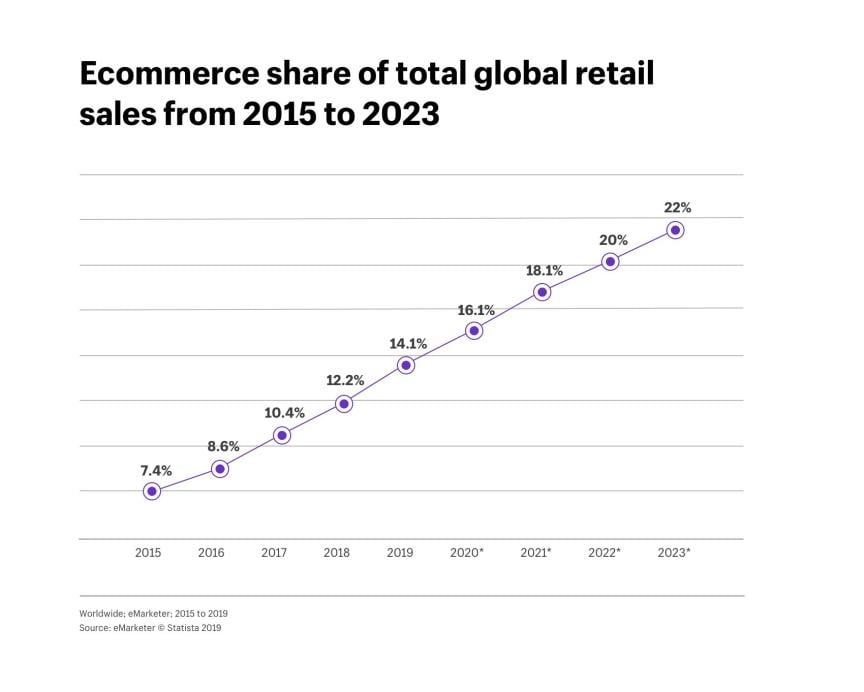
eCommerce trends 2021 – Graph 2015 to 2023
PWA & Headless eCommerce It is so rare for a customer to understand the technical aspects of eCommerce services they love. But it doesn’t mean that it shouldn’t be shaped by the new technology trends.
Headless eCommerce on the other side is an interesting new trend that helps us separate the presentation layer from the eCommerce functionality of a webpage. With the help of PWA, One can personalize the customer experience and also enhance the quality of your content.
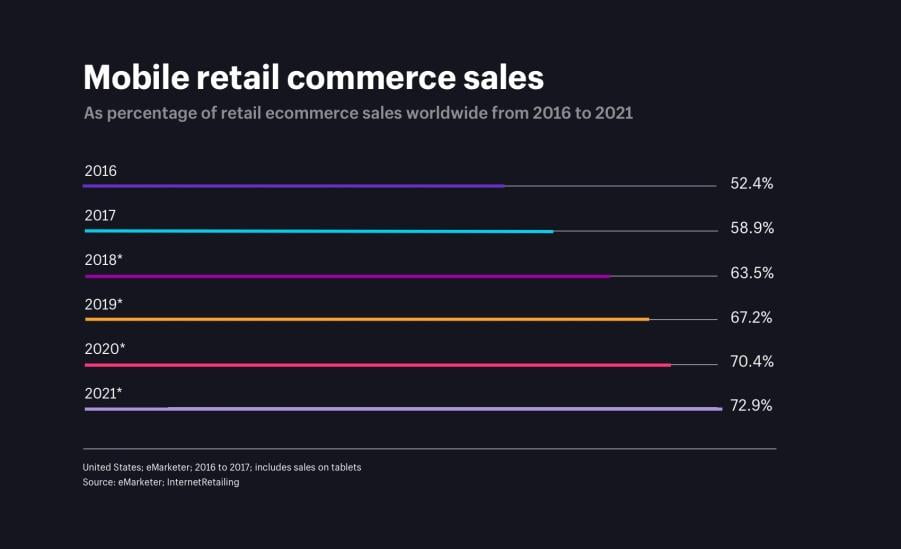
Mobile retail commerce sales from 2016 to 2021
Voice Shopping
Internet users are going crazy over voice shopping helping it gain so much traction. By the end of 2017, almost 13% of the people who own a smart speaker admitted that they make a purchase only with their voice.
OC&C strategy consultants have predicted that this 13% might have a significant rise for up to 55% within 2022. Records are showing a similar rise in the UK as well.
The launch of Amazon’s smart speaker “Echo” officially kick started this trend back in 2014. Since then, the user curve of the voice shopping trend is getting steeper by the day.
Voice shopping is still on the verge of getting perfected, but according to discussed statistics, it should only be getting better and popular over the years.
The major role of Social Media In eCommerce
The number of people who shop through the influence of social media is on the rise. Facebook and Instagram checkouts recently added a “Buy” button to their site which turned out to be a great strategy.
Apart from the effect it has on our everyday life; social media completely changed how we buy things. Brands should make use of this opportunity and escalate the position and popularity they have on social media. Your brand has better chances of getting recognized among the customers. With the number of hours we spend on social media rising every day; seeking help from Instagram Influencers is also a viable option for eCommerce businesses.
eCommerce Personalization
Personalizing your site plays a major role in getting your e-commerce business recognized. A wide range of products are available online and each product needs to get showcased in the right way to the right customer.
Failing to do so will result in your products remaining stagnant in your inventory without reaching the customers who require it. E-commerce Personalization lies in understanding the choice and needs of each customer and offering them a unique tailored experience. Employing this strategy will help you see a 20% increase in sales.
Research Online, Purchase Offline
People have always preferred to buy products offline after researching them online. And some might do the opposite of researching offline and buying them online.
Almost 88% of the customers browse through the internet before buying something. Even if there’s nothing new to this, the number of people who follow this strategy would grow in 2021.
SMS (Text) Marketing for eCommerce Sites
A report produced by mobilestatistics.com says that an average person spends about 90 minutes a day staring at their phones. By summing this up, we spend about 23 days a year and almost 4 years of our life doing nothing but this.
Although there is nothing new about text messaging, there are several brands that still don’t use it to its full potential in communicating with their customers.
Emails have an opening rate of 20% whereas this goes as high as 98% in the case of text messages. To put it in simple words, the odds of a customer seeing a text message are significantly higher.
User-generated content (including influencers and reviews)
Customers have a hard time trusting traditional adverts, and they choose to prefer recommendations and reviews instead. Almost 68% of online shoppers say that reliable reviews were all they needed to make a purchase.
The reviews that online shoppers leave for a product is the most sought-after user-generated content. To increase customer engagement rate, give more importance to reviews of both your business and individual products.
Price Transparency
Customers lose interest and opt-out of the checkout process when they encounter unforeseen fees and charges. By remaining transparent about your prices, fees, practices, and charges, you have better chances of success while entering into 2021.
Apart from being open and upfront about your prices and fees, there are certain things that you should take care of. You must avoid withholding any information in the fine print about your data privacy, return policy, and exceptions.
Free Shipping and Free Returns
Free shipping is ubiquitous and this trend is only going to grow in popularity in 2021. Almost every consumer expects their products to have free shipping and it will be extremely hard to pin a delivery fee on to a purchase particularly if the product costs above a certain price range.
If you don’t currently have an option to deliver your products for free, this a great time to start thinking about ways to make it possible. This might be a major factor that’s holding back your sales. Offering various delivery options and each having their own speed is a great start. If you are planning on taking it up a notch, offer free returns too.
Environmental Topics Influence Buyers
Green consumerism is gaining more attention than ever before and brands should start giving importance to it. Half of the online consumers admit that environmental factors play a major role in making purchase decisions.
It is essential for e-commerce businesses to adapt to various sustainable practices. People have started respecting the environmental concerns and the impact that a product has over it.
It is the responsibility of online businesses to make sure that their practices are eco-friendly. Sourcing products from fair-trade organizations would make the job of stepping into a greener eCommerce environment easier for you.
Flexible Payment Options for Big Purchases
Attempting to sell products having expensive price labels might turn out to be a difficult task. New customers generally don’t engage in expensive purchases owing to the risk that’s involved.
Afterpay, Final, and Affirm are some of the flexible payment options that you can offer to battle this problem.
New Countries and Territories
By the end of 2020, the world’s middle-class population will have over 1.4 billion new additions out of which about 85% would come from the Asia Pacific Region (APAC).
The entire eCommerce trend seems to be drifting apart from the west even after the active Chinese economy settles. Focusing on countries with higher growth rates will yield great profits.
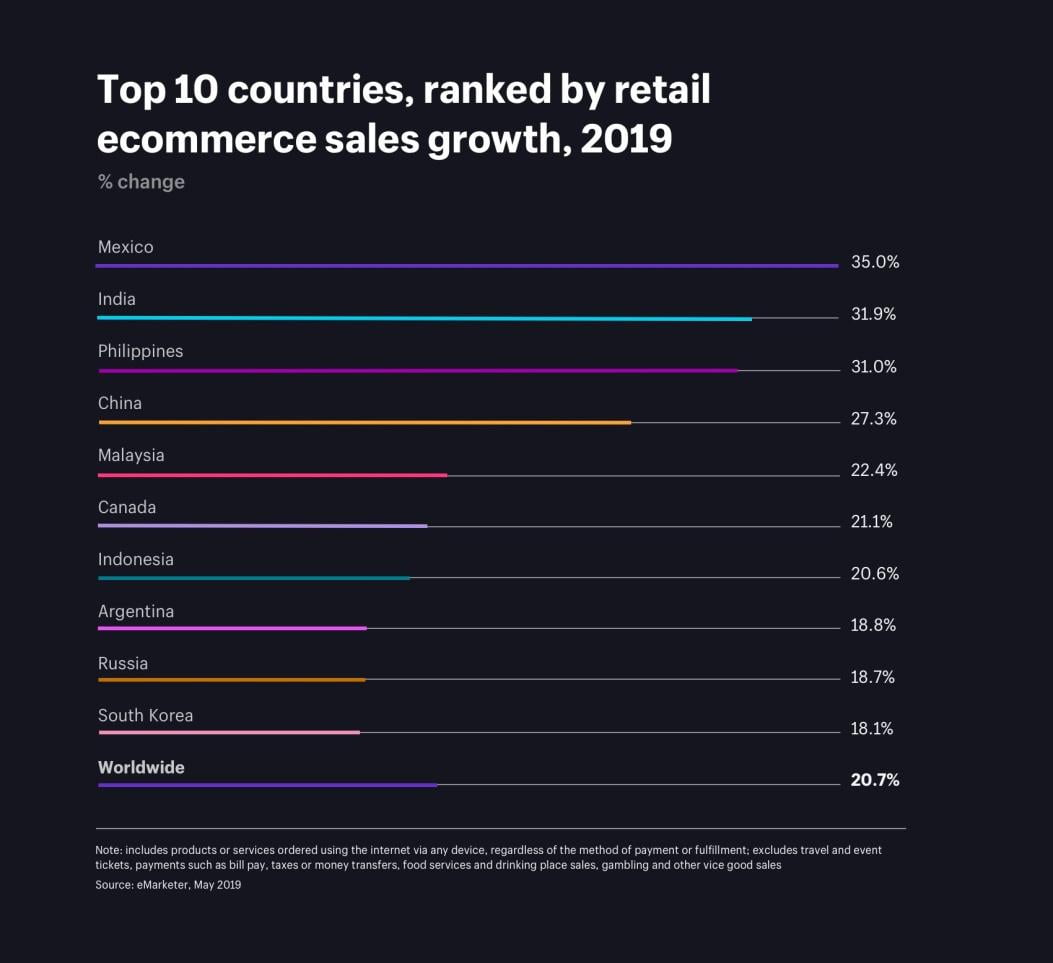
eCommerce trend growth country-wise
Live chat will be inevitable
This generation has a lot of people who seek instant appreciation. Email conversations and phone calls are going out of trend and people are losing interest in them.
Live chats are a great way for eCommerce businesses to provide customer support and clear the doubts they have over a product.
Video Marketing will grow without any doubt, but not as fast as you think
Understanding your customers and creating content that they can relate to and understand better is vital irrespective of the medium that you are going to use.
This includes podcasts, audio, videos, and written posts. However, proofs stating that customers react better to video reviews and product overviews increasing the chances of a sale. In case you haven’t already started it, 2021 is a great year to make use of video reviews.
Visual commerce will boom
In an eCommerce store, the major task is to sell products to a customer who can never physically interact with the product. Visual commerce can step up and help you here. To put it in simple words, it is an evolution from the conventional static visuals.
Instead of saturating your business’ marketing with just product photos, visual commerce takes this once step higher. It makes use of engaging videos, interactive content, consumer-generated media, and augmented reality.
Employing User-generated content on Social Media
Influencer partnerships have been a part of a brand’s marketing strategy for quite a while now. User-Generated Content (UGC) is a great upside of social media campaigns that we’re just beginning to explore.
When influencers share photos and videos of a product, it can kindle various distinctive and appealing ideas.
Consumers find it even more trustable and authentic to make a purchase decision when common people talk about your product compared to celebrities and models.
Reports say that over 64% of the people on social media rely on UGC every time they make a purchase. The view of a UGC video is tenfold higher compared to the ones made by the brand itself.
B2B eCommerce
The overall revenue of B2B eCommerce would rise to over $6.6 trillion within 2021 while B2C eCommerce would stumble behind with revenue of $3.2 trillion. This is a trend that you can never afford to miss.
The B2B model has always been dominant in the e-commerce market. Adopt B2B solution for your business. Not just customers, but almost every business needs goods and services in order to survive and thrive.
The only task is to have a better understanding of their needs and shopping experiences. This trend is going to shoot up in 2021. Let’s wait and witness the massive growth in the eCommerce sector.
Let’s initiate a discussion!!
With Only Agency that provides a 24/7 emergency support.
Well, Everyone Hates Pop-up!!
But here we are again to tell you, we are the best in Magento and no one can serve you better in Magento than us.