We will create a new category page layout and use that layout using the custom category attributes in Magento 2.
Why would you need to add a custom layout to a category?
1. To add your custom css for specific page.
2. Insert more page information.
3. To add custom JS to the page, such as GTM script.
We will use events and observers to add a custom layout to the category page. We will use the layout_load_before because there is no other point to append a custom layout until the page is rendered.
Please follow the below steps.
Step 1: Create a custom module then add below files in that created module. For example assume that i have created “Magemonkeys/CategoryLayout”.
Step 2: Create InstallData.php at app/code/Magemonkeys/CategoryLayout/Setup/
Here we create the custom category attribute code as shown below:
<?php
namespace MagemonkeysCategoryLayoutSetup;

use MagentoEavSetupEavSetupFactory;
use MagentoFrameworkSetupInstallDataInterface;
use MagentoFrameworkSetupModuleContextInterface;
use MagentoFrameworkSetupModuleDataSetupInterface;

class InstallData implements InstallDataInterface {
	private $eavSetupFactory;

	public function __construct(EavSetupFactory $eavSetupFactory) {
		$this->eavSetupFactory = $eavSetupFactory;
	}

	public function install(ModuleDataSetupInterface $setup, ModuleContextInterface $context) {
		$eavSetup = $this->eavSetupFactory->create(['setup' => $setup]);
		$eavSetup->addAttribute(MagentoCatalogModelCategory::ENTITY, 'new_layout', [
			'type' => 'int',
			'label' => 'New Layout',
			'input' => 'boolean',
			'source' => 'MagentoEavModelEntityAttributeSourceBoolean',
			'visible' => true,
			'default' => '0',
			'required' => false,
			'global' => MagentoEavModelEntityAttributeScopedAttributeInterface::SCOPE_STORE,
			'group' => 'Display Settings',
		]);
	}
}
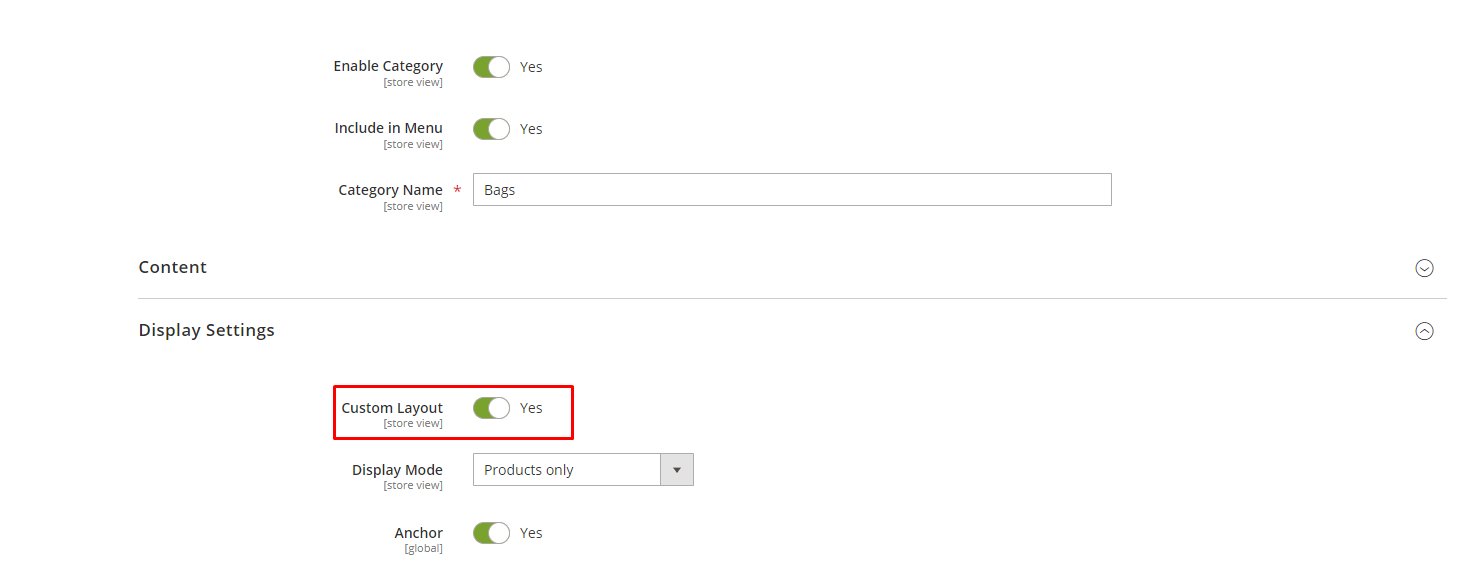
Step 3: Create category_form.xml at app/code/Magemonkeys/CategoryLayout/view/adminhtml/ui_component/
Here we display the Custom Category attribute on the Display Settings tab in the Admin Side Category View page:
<?xml version="1.0"?>
<form xmlns:xsi="http://www.w3.org/2001/XMLSchema-instance" xsi:noNamespaceSchemaLocation="urn:magento:module:Magento_Ui:etc/ui_configuration.xsd">
    <fieldset name="display_settings">
        <field name="new_layout">
            <argument name="data" xsi:type="array">
                <item name="config" xsi:type="array">
                    <item name="dataType" xsi:type="string">boolean</item>
                    <item name="formElement" xsi:type="string">checkbox</item>
                    <item name="label" xsi:type="string" translate="true">Custom Layout</item>
                    <item name="prefer" xsi:type="string">toggle</item>
                    <item name="valueMap" xsi:type="array">
                        <item name="true" xsi:type="string">1</item>
                        <item name="false" xsi:type="string">0</item>
                    </item>
                    <item name="default" xsi:type="number">0</item>
                </item>
            </argument>
        </field>
    </fieldset>
</form>
Now you can check this layout in the admin panel configuration.
Step 4: Create events.xml at app/code/Magemonkeys/CategoryLayout/etc/frontend/
Here we use the layout_load_before code.
<?xml version="1.0"?>
<config xmlns:xsi="http://www.w3.org/2001/XMLSchema-instance" xsi:noNamespaceSchemaLocation="urn:magento:framework:Event/etc/events.xsd">
    <event name="layout_load_before">
        <observer name="category_custom_layout" instance="MagemonkeysCategoryLayoutObserverCategorycustomlayout" />
    </event>
</config>
Step 5: Create Categorycustomlayout.php at app/code/Magemonkeys/CategoryLayout/Observer/
Here we check the category attribute is enabled/disabled and add the layout handle for page layout.
<?php

namespace MagemonkeysCategoryLayoutObserver;

use MagentoFrameworkEventObserver;
use MagentoFrameworkEventObserverInterface;
use MagentoFrameworkRegistry;

class Categorycustomlayout implements ObserverInterface {
	const ACTION_NAME = 'catalog_category_view';

	/** @var Registry */
	private $registry;

	public function __construct(
		Registry $registry
	) {
		$this->registry = $registry;
	}

	public function execute(Observer $observer) {
		if ($observer->getFullActionName() !== self::ACTION_NAME) {
			return;
		}

		$category = $this->registry->registry('current_category');

		/** @var MagentoFrameworkViewLayout $layout */
		if ($category->getCustomLayout()) {
			$layout = $observer->getLayout();
			$layout->getUpdate()->addHandle('catalog_category_custom_view');
		} else {
			return true;
		}
	}
}
Step 6: Create catalog_category_custom_view.xml at app/code/Magemonkeys/CategoryLayout/view/frontend/layout/
Here we remove the sidebar wishlist and custom class.
<?xml version="1.0"?>
<page xmlns:xsi="http://www.w3.org/2001/XMLSchema-instance" layout="2columns-left" xsi:noNamespaceSchemaLocation="urn:magento:framework:View/Layout/etc/page_configuration.xsd">
    <body>
    	<attribute name="class" value="catalog_category_custom_view" />
        <referenceBlock name="wishlist_sidebar" remove="true" />
    </body>
</page>
Apply some CSS for styling and you’ll have your new page layout with new customised content a couple of times.